It's too much to type again, so I'm attaching an email I sent with all the info and pictures.
Hi Arv (and Gene),
It's 3am and I just got back from a long night at the casino playing nickle keno...so cut me some slack.
Apparently the tire is repaired. I now realize that my first repair attempt at the stem was probably good - there was just more air to escape after inflating the tube than I expected. When I added the Slime the patch was immediately loosened, but I should have been more patient. Ultimately my homegrown method of vulcanizing a patch worked. I took some vinyl (that fiber optics had been enclosed in, I think) and melted it around the stem with my heat gun and that held. I'm kinda proud of that idea. Next time I may put pressure on the patch with a clamp like we did when kids fixing our bike tubes. So...after 3 days of monkeying with that tire I was anxious to test the transaxle (which I had repaired after a previous failure of it). Never mind that I was smack in the middle of painting the tractor, I just had to try it out. Guess I'll have to clean it again and finish the painting.
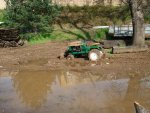
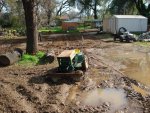
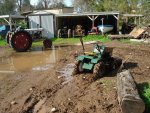
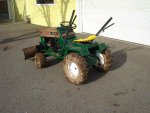
It ran terrible! The engine sputtered and coughed and the tranny kept popping out of gear, not to mention that it could hardly grade mud at all. When the differential locked up, due to the mud strain I guess, I decided to take these pictures. After jacking it up (with an old car bumper jack...which I absitively LOVE), the diff. released. It had become bogged down so I yanked it out with my White tractor.
When I disassembled the tractor several months ago I lost the long spring that stabilizes the throttle so I drove it up to the shop and fashioned one from a very light bungy cord. WOW! That made a huge difference! Now I could tune the carb and it ran smooth and strong. Who wouldda thought??? I noticed that the shift lever was hitting the inner plate steel support cage I welded in, and is probably preventing it from going completely into gear, so..I attached a spring to hold it in place. I'll cut the steel away so it won't be restricted, but the spring enabled me to finish the test run. 1st gear is VERY low and the pattern is opposite Reverse - so, I tried 2nd (which is on the same side as reverse). The spring worked fine and I was able to shift from 2nd to reverse easily. I found that the belt whined a lot, but it actually did a better job of grading in 2nd. It's a poor, old belt, so I don't mind finishing it off with these tests. I also removed a 2" nipple from the front control pipe and it was more comfortable to operate.
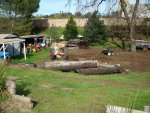
Before testing with the box scraper (which is being prepped for paint now), I will add a short spring to the bottom of the left control arm to assist in lifting the blade and holding it in grading position. The mud sticks to the blade and becomes quite heavy. This little riding mower is never going to attain "tractor" status, so I plan to take your suggestion, Arv, and weld on an adjustable depth control to the back of each end of the blade. About 1/2" depth is about all it can handle, and that's enough for play. I finished smoothing that area and was pooped. I expect the scraper to do a better job of moving dirt. I suppose a little bucket would be a better implement for the front, but I'm done working on that girlie "mower". I left the control arms long, not knowing how much leverage would be needed, but I've decided to cut them off now a hand's width above the lock pivot. It will look a lot better. Perhaps you recall, Arv, that I made a large articulating blade for this tractor, but the tractor can't handle it. I took this heavy but small blade from the Perrin and will fit the new blade to the Perrin (which now has hydraulics). I'm convinced it will be a lot easier on the tractor if I mount this small blade at an angle to avoid the sudden strain when hitting a mound with the blade head-on. I know from experience on the Gibson that a little angle makes the entry into the dirt much easier AND it moves the dirt to one side for more efficient grading. I'll just make a wedge for the mount plate and bolt it up that way and leave it. If Hayden (Grandson) can't operate it for play I'll sell it for whatever I'm offered. Including the purchase, new steel, weld rod and torch costs etc. I think I'm still under $200 cost. Adapting the walking-tractor wheels, tires and weights enabled it to slog thru the mud OK if the blade didn't stick. I will hate to lose those tires and wheels, but the original turf tires and wheels are worthless...unless used for mowing. The value of those wheels would raise my cost above my guesstimate (above), but I couldn't sell it with worthless tires and wheels.
I posted pictures of this frame (hung like a deer), so may post this info and pic's also. S'nuffsaid, Over & Off, Gary
Hi Arv (and Gene),
It's 3am and I just got back from a long night at the casino playing nickle keno...so cut me some slack.
Apparently the tire is repaired. I now realize that my first repair attempt at the stem was probably good - there was just more air to escape after inflating the tube than I expected. When I added the Slime the patch was immediately loosened, but I should have been more patient. Ultimately my homegrown method of vulcanizing a patch worked. I took some vinyl (that fiber optics had been enclosed in, I think) and melted it around the stem with my heat gun and that held. I'm kinda proud of that idea. Next time I may put pressure on the patch with a clamp like we did when kids fixing our bike tubes. So...after 3 days of monkeying with that tire I was anxious to test the transaxle (which I had repaired after a previous failure of it). Never mind that I was smack in the middle of painting the tractor, I just had to try it out. Guess I'll have to clean it again and finish the painting.
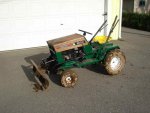
It ran terrible! The engine sputtered and coughed and the tranny kept popping out of gear, not to mention that it could hardly grade mud at all. When the differential locked up, due to the mud strain I guess, I decided to take these pictures. After jacking it up (with an old car bumper jack...which I absitively LOVE), the diff. released. It had become bogged down so I yanked it out with my White tractor.
When I disassembled the tractor several months ago I lost the long spring that stabilizes the throttle so I drove it up to the shop and fashioned one from a very light bungy cord. WOW! That made a huge difference! Now I could tune the carb and it ran smooth and strong. Who wouldda thought??? I noticed that the shift lever was hitting the inner plate steel support cage I welded in, and is probably preventing it from going completely into gear, so..I attached a spring to hold it in place. I'll cut the steel away so it won't be restricted, but the spring enabled me to finish the test run. 1st gear is VERY low and the pattern is opposite Reverse - so, I tried 2nd (which is on the same side as reverse). The spring worked fine and I was able to shift from 2nd to reverse easily. I found that the belt whined a lot, but it actually did a better job of grading in 2nd. It's a poor, old belt, so I don't mind finishing it off with these tests. I also removed a 2" nipple from the front control pipe and it was more comfortable to operate.
Before testing with the box scraper (which is being prepped for paint now), I will add a short spring to the bottom of the left control arm to assist in lifting the blade and holding it in grading position. The mud sticks to the blade and becomes quite heavy. This little riding mower is never going to attain "tractor" status, so I plan to take your suggestion, Arv, and weld on an adjustable depth control to the back of each end of the blade. About 1/2" depth is about all it can handle, and that's enough for play. I finished smoothing that area and was pooped. I expect the scraper to do a better job of moving dirt. I suppose a little bucket would be a better implement for the front, but I'm done working on that girlie "mower". I left the control arms long, not knowing how much leverage would be needed, but I've decided to cut them off now a hand's width above the lock pivot. It will look a lot better. Perhaps you recall, Arv, that I made a large articulating blade for this tractor, but the tractor can't handle it. I took this heavy but small blade from the Perrin and will fit the new blade to the Perrin (which now has hydraulics). I'm convinced it will be a lot easier on the tractor if I mount this small blade at an angle to avoid the sudden strain when hitting a mound with the blade head-on. I know from experience on the Gibson that a little angle makes the entry into the dirt much easier AND it moves the dirt to one side for more efficient grading. I'll just make a wedge for the mount plate and bolt it up that way and leave it. If Hayden (Grandson) can't operate it for play I'll sell it for whatever I'm offered. Including the purchase, new steel, weld rod and torch costs etc. I think I'm still under $200 cost. Adapting the walking-tractor wheels, tires and weights enabled it to slog thru the mud OK if the blade didn't stick. I will hate to lose those tires and wheels, but the original turf tires and wheels are worthless...unless used for mowing. The value of those wheels would raise my cost above my guesstimate (above), but I couldn't sell it with worthless tires and wheels.
I posted pictures of this frame (hung like a deer), so may post this info and pic's also. S'nuffsaid, Over & Off, Gary