Changing the Front Boots on RTV900

Fitch

Active member
Thanks for welcome and the feedback folks.

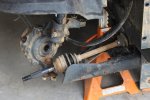
My RTV has a curved metal shield bolted to the front of the A-arm. You can see it in the picture. My boot didn't get ripped by a stick, it failed, after 10 years and 1,977 hours, in what looks like a perfectly circumferential fatigue failure at the point of maximum flex stress when the wheels are turned. If the wheel is straight you can't tell it's damaged. It just pulls apart when the wheel is turned.

I put my fingers into the grease that's exposed in the picture. It has no grit in it. No evidence of dirt, so hopefully I've dodged a bullet.

The plan is to replace both boots on both front CV joints (drive shafts?).

There is no way I'd use that split boot. This repair is easy enough that I can't see any reason not to do the very best job possible. That split boot just doesn't look as good to me as the one piece that's lasted 10 years - this time anyway.

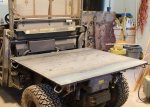
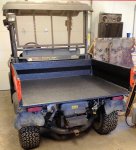
I cleared out the wood shop to make room, backed in and put it up with 4x4 under the rear wheels and jack stands under the frame.

I'll take it apart tomorrow and get things ready for when the boot kits arrive.

I'll drain and replace the oil in the knuckles and front differential while I'm at it.

Fitch

When I disassembled the front end I learned I have plastic guards (mud holders?), not metal ones like I posted earlier. :oops:

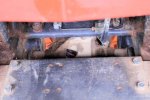
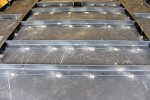
I removed the front skid plate. It was packed solid with mud between it and the front axle (differential?) housing. (Picture) I'm not too surprised, I live in So. Central PA which is the mud belt.

The front axle had 740ml of oil in it. I've never added any. Every time I checked it since the thing was new the second (top) notch was full. The knuckle housings had 120ml each. I figured as long as I had access to everything I'd replace it.

I'm not going to replace the (expensive) knuckle seal. There is no evidence of leakage (see pictures). The fact that both knuckles had 120ml of lube in them is further proof there is no leakage. The seal rotates with what Kubota calls the front axle (hub?) so I'm not disturbing the seal at all with this boot replacement.

It looks like I'll be able to take out the bolts to remove the flange from the front axle housing with out removing the A-arms. Even after pressure washing it yesterday to clean it up, which helped a lot, I still need to get a stiff long handled brush to get up in there and brush the dried mud off everything and wipe it down before I want to break that seal.

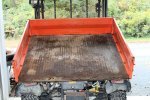
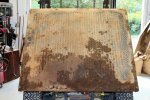
I discovered a lot of rusty metal on the rear of the front fender wells. There are some other places that are showing their age. While I'm waiting for parts I'll take a power wire brush to that, paint it with some sort of rusty metal primer, then give it a coat of gray paint. When I replaced the rotted deck sheet metal on the dump bed (cut it off, welded on a new one) I discovered a Rustoleum gray that is an acceptable match for the Kubota gray.

Fitch
 

Attachments

  • IMG_2215 Dirt trapped by front skid plate - C - RS1200.jpg
    IMG_2215 Dirt trapped by front skid plate - C - RS1200.jpg
    63.1 KB · Views: 221
  • IMG_2219 Right Front Partially Disassembled - C - RS1200.jpg
    IMG_2219 Right Front Partially Disassembled - C - RS1200.jpg
    60.5 KB · Views: 219
  • IMG_2221 Left Front Partially Disassembled - C - RS1200.jpg
    IMG_2221 Left Front Partially Disassembled - C - RS1200.jpg
    72.4 KB · Views: 220
  • IMG_2225 Front Axle Housing Front View - RS1200.jpg
    IMG_2225 Front Axle Housing Front View - RS1200.jpg
    61 KB · Views: 219

bczoom

Senior Member
Staff member
Gold Site Supporter
Once you're done painting the bad areas, look into Fluid Film as a rust preventative. A bunch of us use it on our RTV's as well as other things to keep the rust away.
 

Mark.Sibole

Well-known member
You shouldnt be riding it in the mud.You act like its an all terrain vehicle or something.
Keep it parked in the garage it will looknice for a long time. lol
:yum:
 

Fitch

Active member
You shouldnt be riding it in the mud.You act like its an all terrain vehicle or something.
Keep it parked in the garage it will looknice for a long time. lol
:yum:

I know. Alas, this is a working vehicle. It's used at least twice a day every day including holidays and Christmas. Not only do I drive it in the mud, every morning I fill the back of it full of ... used horse food. Gotta love that hydraulic dump box when ya gotta lot of ... uh .... 'stuff' to unload. Pull the lever, drive away peacefully. Major feature. So is the 4WD and Diesel power.

Horse manure is very corrosive. I had a fiberglass bedliner in it. Big mistake. Should have had the bed coated with Rhinoliner. After I fixed it, cut off the old and welded on a piece of 14 gage sheet metal, I did that.

The pictures show before, during and after the bed rot fix. It took me a while but it got done.

Fitch
 

Attachments

  • IMG_1042 Bed Liner and tail gate removed - RS1200.jpg
    IMG_1042 Bed Liner and tail gate removed - RS1200.jpg
    102 KB · Views: 209
  • IMG_1058 Bed sides removed - RS1200.jpg
    IMG_1058 Bed sides removed - RS1200.jpg
    94.3 KB · Views: 208
  • IMG_1077 Welding Done 1 - RS1200.jpg
    IMG_1077 Welding Done 1 - RS1200.jpg
    73.3 KB · Views: 207
  • IMG_1110 Reinstalled on RTV Chassis - RS1200.jpg
    IMG_1110 Reinstalled on RTV Chassis - RS1200.jpg
    80.7 KB · Views: 210
  • IMG_1406 Curing with tail lights reinstalled - RS1200.jpg
    IMG_1406 Curing with tail lights reinstalled - RS1200.jpg
    59.8 KB · Views: 207

King

Member
wow that looks great better than new. These rtv sure are best units around for a working machine .
 

Mark.Sibole

Well-known member
Nice job on the bed.
Yes Horhse shit is as corossive as a liberal lol.
When i do any farm work here it is power washed to get rid of the horse poopoo. The rest of the work it does is mainly plowing in the winter and hauling wood in the summer.
I have the advantage of lack of mud here also.Were all sand but the drawback to that is the sand pulls the oil out of tieds and they do like to dry rot here.
Wouldnt do without my RTV and this forum!
 

Fitch

Active member
Nice job on the bed.
Yes Horhse shit is as corossive as a liberal lol.
When i do any farm work here it is power washed to get rid of the horse poopoo. The rest of the work it does is mainly plowing in the winter and hauling wood in the summer.
I have the advantage of lack of mud here also.Were all sand but the drawback to that is the sand pulls the oil out of tieds and they do like to dry rot here.
Wouldnt do without my RTV and this forum!

Thanks, Mark.

It was a lot of work. But it's holding up nicely a year later.

I know exactly what it's like there. Really sandy. Pines, birch, and bracken. Born and raised in TC (Class of '60. I hardly recognize it when I visit). I have relatives that live on Supply Road.

Fitch
 

bordercollie

Gold Site Supporter
Gold Site Supporter
Fitch, That cargo bed looks great A++ job !.
I have to agree with Mark.... horse and cow manure are the pits on a machine. Never have heard it put like Mark did, but haha I agree ! collie
 

Fitch

Active member
Fitch, That cargo bed looks great A++ job !.
I have to agree with Mark.... horse and cow manure are the pits on a machine. Never have heard it put like Mark did, but haha I agree ! collie

Thanks. Yeah, they really are the pits. So far the Rinoliner is holding up well and it doesn't let stuff get underneath it like the plastic liner did.

The tricky part was correcting the distortion to get it back to flat. After the welding (MIG to minimize heat input) was done the long box beams had cupped the bed nearly an inch. The angle pieces had also cupped but not as much. That had to be corrected. Not hard, just tricky. Patience is rewarded.

Fitch
 

Fitch

Active member
Okay, all done. Some notes possibly of interest.

I finished replacing all four front boots and put the RTV back in service to cheers from the barn crowd.

Some observations:
  1. The first thing I noticed was the profound difference in suppleness between the old boots and the new boots. The old ones were really stiff compared to the new ones. I was very glad I'd decided to replace all four of them. It occurs to me that I should investigate what it takes to replace the boots on the rear axle. Those boots don't have as much angle but they are the same age as the one's I took off and aren't getting any younger. I didn't want to do that now. The unit has been out of commission for a week and the barn crew (my bride of 46 years :smile:) was starting to protest.
  2. The second thing I noticed was that the O-ring that seals the flange to the front differential housing fits in a circular groove on the bearing retainer (AKA flange that bolts to the side of the differential housing). The sealing surface showed no sigh of leaking but the ring was hard, so removed it, cleaned the surface and I ordered two new ones. When I reassembled it I fit the ring into the groove on the flange to hole it in position. I had to gently force it into the groove since it's natural OD is bigger than the groove. The resulting friction fit held it in place very nicely when I reinstalled the inner end of the front drive shafts into the differential.
  3. The seal on the inside of that flange that seals to the shaft where it penetrates the flange is one of the differential housing oil seals. It had gotten quite hard and inflexible over the decade of use so I ordered two new seals. When the new seal arrived I tried it on the shaft and the difference in fit was profound. It was obvious the new one will seal better than the old one. I really don't like re-using ten year old seals that have been disturbed. I was very glad I replaced them. FWIW: a 1-1/8" socket, inverted with a short extension in it, works nicely to drive the new seal when it's installed.
  4. I bought two outer and two inner boot kits from Kubota. They were pricy but I figured that the OEM parts had lasted 10 years so why not go for another 10 with Kubota replacement parts. The inner boot kit (DOJ) had a large band # WK4268, a small band, a new circlip, a new snap ring, the boot, and a package of CV joint grease.
  5. The outer boot kit (BJ) contained two different size large bands, LN5568 for the outer boot WK4268 for the inner boot, and two small bands. It also contained a circlip, snap ring, 2 packages of CV joint grease and of course the outer boot.
  6. I bought new cotter pins for the axel nuts and the tie rod ends. Okay, I bought a box that had an assortment of cotter pins which included the right sizes for this project. I already had a box like that but I couldn't find it. Sigh ...
  7. The rest of the supplies included a gallon of mineral spirits for cleaning the parts.

I cleaned the inner joint parts in a bucket with mineral spirits and a nice parts cleaning brush. When all those parts were squeaky clean I put them in a sandwich bag, one for each axle shaft, along with the new circlup and snap rings from the kits.

The left front drive shaft slid right into the differential housing, no problem. I torqued the bolts per the table in the front of the service manual (Page G9 in my manual).

When I went to reinstall the right front drive shaft end into the differential it didn't want to go in. I remembered it was hard to pull it out so I looked at it. The end of it looked like it had rubbed on something and the grooves weren't quite full size right on the end. I used a small triangular tool maker's file and carefully filed the end of the grooves to the same profile as the rest of the groove. Flushed the filings off with mineral spirits, blew it dry, used my fingers to put a coat of Super UDT oil on it, and tried again. It went right in, no problem.

When I refilled the front differential with 600 ml. of Super UDT it didn't fill it to the second mark on the dip stick. So I added another 50ml. and it was just barely above the second mark. That'll work.

The front knuckles took just 100 ml before they over flowed the fill hole. I drained 120 out of each one so apparently when they were filled at the factory they tilted them so the fill hole was higher than it is when it's on the machine.

I struggled a bit at first to get the lower ball joint into the lower A-arm. Between the force required to get the outter stub axle into the knuckle and maneuver the lower ball joint into position I came close to using a bad word, but then it went, every thing fit, and the second one was a piece of cake.

I had to over tighten both tie rod ends a fraction of a turn to get the new cotter pin inserted.

I torqued the axle nut to the specified 110 lb.-ft. and the cotter pin hole lined up! On both axles. Who'd a thunk it?

It's done as 'right' as I knew how to do it. Hopefully it lasts another 10 years.

Thanks to BorderCollie for starting this thread. When I was faced with a broken boot and uncertainty, the data she provided was a huge confidence builder.

Fitch
 

bordercollie

Gold Site Supporter
Gold Site Supporter
Great job Fitch. :tiphat: You may not need to worry about doing the rear unless you see something wrong because you will probably need to replace the rear ujoints one day, and the boots may hold till then. Gotta take off that bumper and access the boots there by cutting the bands and slipping the inner from the outer joints where they go together inside the boots.( to me, it resembles a sliding shaft on a pto implement).
Ya'll have a wonderful evening. collie
 

Fitch

Active member
FWIW: Probably because I'm older than dirt, I know about a kind of rear suspension called the de Dion suspension. My 2004 RTV900W has a classic De Dion rear suspension. The tube the manual calls the 'bumper' is technically properly called a de Dion tube. They apparently used it because it was designed to have the differential housing fastened solidly to the frame, as is our transaxle, yet allow the rear wheels to move up and down to provide suspension.

On race cars, where it was first used, it radically reduced the un-sprung weight and improved cornering. Un-sprung weight is not really an issue on our RTV but it allowed them to use the rear engine and Transaxle with out having to stretch the frame to allow for a conventional axle and drive shaft behind it.

I noticed the new models, not sure when they first appeared, have a fully independent rear suspension with what looked, at a quick glance, like double 'A' arms. I suspect that gives more rear wheel movement. For me, where we drive this daily, that's not needed, but I can see where it might be a feature for those who drive in really rough ground.

My old one isn't going anyplace until it's died to the point I can't resuscitate it no matter what I do. It has a feature none of the new ones have: it's paid for. :smile:

My 2004 ZD21, which has effectively two engine speeds, idle and full throttle, has started using oil at ~1,200 hours (puff of blue smoke when started hot and down about a quart in 50 hours). Hopefully it goes another 1,200 before it needs major help. The RTV engine has a much easier life. At just 1,977 hours it's using no oil at in the 100 hour oil change intervals. I'm not sure what the life of an RTV engine is but I'm hoping it's closer to 4,000 or 5,000 hours.

Fitch
 

bordercollie

Gold Site Supporter
Gold Site Supporter
Fitch, I sold my first RTV 900 with over 4,200 hrs and zero blow by and no oil use . :) collie
 

David69

Active member
bordercollie, does the outer end come apartso I can replace the outer boot ONLY....your words.."I have flipped over the axle- now working on the inner side. Even though this boot is aged, it's not cracked but it is the only end that can be taken apart. So to replace the boot(s) apart it comes."

Thank you in advance

David
 

bordercollie

Gold Site Supporter
Gold Site Supporter
bordercollie, does the outer end come apartso I can replace the outer boot ONLY....your words.."I have flipped over the axle- now working on the inner side. Even though this boot is aged, it's not cracked but it is the only end that can be taken apart. So to replace the boot(s) apart it comes."

Thank you in advance

David

If you are careful cutting the bands,You can remove both boots and reuse the good one with new just new bands . . That way, you can get to the bad boot easily. Just remember to work the joint back and forth before tightening the final clamps in place. If you have a bad joint, I think that there is now an aftermarket whole assembly reasonably priced. I can look that up tonight if you need it. bordercollie
 

David69

Active member
I am replacing the outer boot only. Can I place the boot over the outer bearings or is that impossible to disaseble and have to go through the inner end.?
 

bordercollie

Gold Site Supporter
Gold Site Supporter
I am pretty sure my manual said not to disassemble the outer joint . I went in through the inner. Doing that will only require new bands on that. I bought those at a mom and pop autoparts store cheap. Take pictures as you work. It will be helpful when going back together. Good Luck, collie
 

David69

Active member
Collie,

I do not understand this part. Can you explain?........ "I will also loosen the nut holding the strut on the knuckle case-but not remove it.I marked it's resting place on the knuckle case so if it moved, I could put it back exactly" .... Resting place?

Thanks in advance

David
 
Top