You are using an out of date browser. It may not display this or other websites correctly.
You should upgrade or use an alternative browser.
You should upgrade or use an alternative browser.
Block heater
- Thread starter JP1100
- Start date

Here It Is !!!!!
Hey,
Had to Jack with ya >>>>
Go to the seach tab, and I remember maybe two or so years ago, someone posted something about them installing one.
......... two guns

If this is a freeze plug type heater.
This is all I have found ......
Does yours look like anything like this ?
http://www.autocoolingsolutions.com/Installation_Instructions_for_Immersion_Screw_In_H.pdf
This is all I have found ......
Does yours look like anything like this ?
http://www.autocoolingsolutions.com/Installation_Instructions_for_Immersion_Screw_In_H.pdf
Attachments
On our JD tractor, It goes in a freeze plug hole where the water circulates. I put this one in several years ago. It had a curved part on the inside and the thing I remember is making sure that I didn't let it rotate while tightening it. Otherwise, it touched something inside the block and came to a dead stop and could have twisted off. I have also seen them for an oil pan.. bordercollie
Be very careful with the screw-in type heaters. A friend with a McCormick tractor must rebuild the engine due to the coolant leaking out the blocker heater. Apparently, the block heater is not readily visible on his tractor. Don't know the whole details, but do know that it's cost him a lot of $$$$$$.
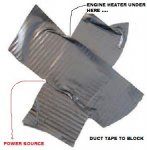
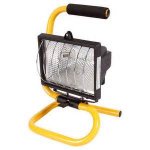
We don't get no extreme cold often. But if we do happen to get some for a few days. This is what we do.
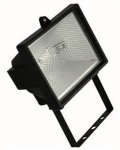
If the equipment is not equipped with a block heater. We have been known to plug up a light and set it up under the
oil pan on the engine. ( Spot, Flood, or Hologen ).
The heat of the light will heat it up, and keep it warm. Works every time !!!!
If the equipment is not equipped with a block heater. We have been known to plug up a light and set it up under the
oil pan on the engine. ( Spot, Flood, or Hologen ).
The heat of the light will heat it up, and keep it warm. Works every time !!!!
Attachments
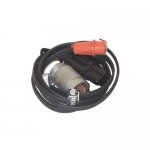
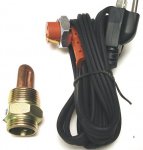
Thanks Two Guns the picture on the left is the one that they sold me at the Kubota dealer. He said something when I bought it about using locktite, but I am not sure what he was talking about.
Locktite, is a threadlocker.
Keeps things from backing out which can cause major problems .....
Comes in Red and Blue.
Red is permanent, blue is semi-permanent.
Use Blue on most.
And RED , if I am absolutly 100% sure I will never have to break it loose again.
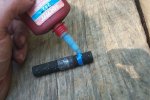
Permatex also make a good threadlocker. Permatex makes gels in higher strength (Purple and Red).
Also, Permatex makes a Green. A low viscosity threadlocking liquid that wicks along the threads of preassembled fasteners to secure them in place.
Apply to nut-bolt seam AFTER assembly.
........ two guns
Attachments
Last edited:
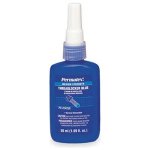
I believe you want to use Locktite 518 for this to seal the threads.
Kubota uses this on most of there pipe threaded joints.
You do not want to lock the application - just seal it.
Actually this what you are suppose to use on the HST flanges when
replacing the U-Joints.
I have used this in many automotive applications - sensors, stats and lots more and never any leaks.
I also use Hi-Tack for lots of applications.
Stuck in NJ
Member
Loctite manufactures fairly diverse Adhesives, Sealants, Lubricants and more. They manufacture a product called Rust Extend, which I use on my pasture gates and trailers. I have used POR 15 in the past and Rust Extend is easier to apply and works just as well - IMHO And yes, for you Fluid Film enthusiasts, you can use it as a top coat once it is cured for that extra double protection.
Another obscure fact - Loctite and Permatex were part of the same company at one time. Ever wonder why some of the adhesives use the same Part Numbers. BE careful about using color for buying/use decision. Always check the product specifications. Many of the same color products have different cure rates, void fill abilities and most important, working temp ranges. Nothing worse then using a product that liquifies at operating temperature. Makes for a very bad day...... Message to take away, use the manufactures web sites to ensure you use the correct product. The Parts Counterman is not always the SME (Subject Matter Expert).
Since this all started with a question about block heaters, KATS's (Five Star Manufacturing) is a good choice. They have an external pad that uses adhesive to attach to the oil pan. I seem to recall through the years other RTV owners have used them and spoke positively in this forum. I've met the owners and they are RTV owners as well.
Loctite manufactures fairly diverse Adhesives, Sealants, Lubricants and more. They manufacture a product called Rust Extend, which I use on my pasture gates and trailers. I have used POR 15 in the past and Rust Extend is easier to apply and works just as well - IMHO And yes, for you Fluid Film enthusiasts, you can use it as a top coat once it is cured for that extra double protection.
.
Excellent information here.......THANKS to YOU and Jamie..........Are you saying in the above that we dont need to use Fluid Film after using Rust Extend......or .........Apply Rust Extend and then use Fluid Film for the protection??????.........God bless......Dennis
Stuck in NJ
Member
Rust Extend requires a top coat for full protection. You can use a good spray paint to color match or fluid film if you like the matte black Rust Extend cures too. I usually use Majic brand spray paint from Tractor Supply as a top coat for my gates. It takes a bit to fully cure but I find the finish to be as good as factory finish.
Obviously, fluid film shouldn't be used on pasture gates or anywhere animals can lick it. I have enough vet bills now with the horses.
Happy Thanksgiving
Obviously, fluid film shouldn't be used on pasture gates or anywhere animals can lick it. I have enough vet bills now with the horses.
Happy Thanksgiving
JP110,
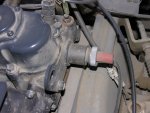
The one on the left is the correct one. I install that one on my 04 900 - it goes in the frost plug at the rear of the head. The dealer should have supplied an install sheet w/ the part. I still have mine - of course drain the coolant. remove the frost plug & clean the opening. I painted mine w/ hi-temp paint prior to the install. Use some type of sealant that u like. Use a 1 inch socket over the treads to protect them - the socket will rest on the shoulder of the heater. Use an appropriate persuader (hammer) to install heater until the other shoulder makes contact with the head. Because I had the coolant out I also added a lower radiator hose heater (from auto parts store). Refill, run, and check for leaks etc. I routed the electric cords to the left side of the engine bay. I mounted a 2 outlet fiberglass electrical box. Wired in the outlet to a single cord - which hangs outside the left frame rail. The 2 heaters are plugged into the outlet. So, when it's cold (it's damn cold in MN) I just plug in the 1 cord to turn on both heaters. I'll try to post some pics - soon
The one on the left is the correct one. I install that one on my 04 900 - it goes in the frost plug at the rear of the head. The dealer should have supplied an install sheet w/ the part. I still have mine - of course drain the coolant. remove the frost plug & clean the opening. I painted mine w/ hi-temp paint prior to the install. Use some type of sealant that u like. Use a 1 inch socket over the treads to protect them - the socket will rest on the shoulder of the heater. Use an appropriate persuader (hammer) to install heater until the other shoulder makes contact with the head. Because I had the coolant out I also added a lower radiator hose heater (from auto parts store). Refill, run, and check for leaks etc. I routed the electric cords to the left side of the engine bay. I mounted a 2 outlet fiberglass electrical box. Wired in the outlet to a single cord - which hangs outside the left frame rail. The 2 heaters are plugged into the outlet. So, when it's cold (it's damn cold in MN) I just plug in the 1 cord to turn on both heaters. I'll try to post some pics - soon
JP110,
The one on the left is the correct one. I install that one on my 04 900 - it goes in the frost plug at the rear of the head. The dealer should have supplied an install sheet w/ the part. I still have mine - of course drain the coolant. remove the frost plug & clean the opening. I painted mine w/ hi-temp paint prior to the install. Use some type of sealant that u like. Use a 1 inch socket over the treads to protect them - the socket will rest on the shoulder of the heater. Use an appropriate persuader (hammer) to install heater until the other shoulder makes contact with the head. Because I had the coolant out I also added a lower radiator hose heater (from auto parts store). Refill, run, and check for leaks etc. I routed the electric cords to the left side of the engine bay. I mounted a 2 outlet fiberglass electrical box. Wired in the outlet to a single cord - which hangs outside the left frame rail. The 2 heaters are plugged into the outlet. So, when it's cold (it's damn cold in MN) I just plug in the 1 cord to turn on both heaters. I'll try to post some pics - soon
GREAT INFORMATION !!!! THANKS !!!!
Okay,
If I can upload the pics, they will show u the install.
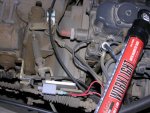
In the 1st photo u can see the lower radiator hose heater - the flash was blocked by the fan blade -but u get the idea.
Any questions - just ask.
If I can upload the pics, they will show u the install.
In the 1st photo u can see the lower radiator hose heater - the flash was blocked by the fan blade -but u get the idea.
Any questions - just ask.
Attachments

Thanks Popo .Those are great pictures and as asset. ") bordercollie
bordercollie
bordercollie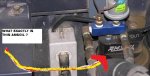
Two Guns,
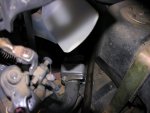
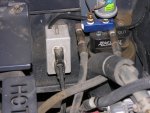
I, like you, like to keep things clean, at least on the inside. It's hard to keep things clean on the outside here in the winter as I don't have a heated area to power wash the outside & underside. I'm a AMSOIL dealer - just 4 myself & friends (I don't have the time to make it a career). That is a AMSOIL by-pass filter system. I drilled & tapped a 1/2" aluminum plate to match the by-pass filter head. Drilled holes to match the threaded holes in the frame (just above the "out" u can see 1 of the bolts to mount the plate to the frame). The line coming in to the blue manifold (on the left) is the supply line to the by-pass filter from a "T" at the oil pressure switch. The next fitting is a oil temp sending unit that goes to the over head console. The large sending unit is for oil pressure, also in the overhead console. All this "stuff" is is pretty tight because the oil pressure sending unit sticks up above the top of the frame & therefore had to forward of the front of the front of the dumpbox.
The by-pass bracket, hardware, etc were installed prior to the addition of the gauges. To eliminate the height problem the AMSOIL spin-on adapter could have been mounted lower. Maybe I should do like Peanuts & make-up a kit for installation of the filter & the filter.