I bought a used 2007 RTV 900 after I already have a 2006 RTV 900. Now I have his and hers! : ) The 2007 has the most hours -- 1300. The valves seem to be a little more noisy on this one with 1300 hours so I thought I would check the valve clearance. However, when I removed the "timing window cover" I find that the flywheel is pitted with rust and I can't seem to find the timing marks. Has anyone else had this trouble? How do you turn the engine to find the marks? I am using the starter but it turns a lot on each bump of the starter. Do you hand turn the engine by the fan or what?
You are using an out of date browser. It may not display this or other websites correctly.
You should upgrade or use an alternative browser.
You should upgrade or use an alternative browser.
Flywheel Timing Marks
- Thread starter wheezer
- Start date
When I checked mine on my 900 it was difficult but I used a socket and ratchet on the front of the engine.
I can't think of a way to do the valves without seeing the mark other than this;
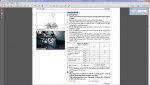
While turning over the engine, watch for the intake valve to open, go down, and then close, come back up.
As you rotate the engine further the piston is on the compression stroke and coming to TDC when it reaches the highest point, and the power stroke begins as the piston goes back down. In other words you are at TDC (top dead center) and both intake and exhaust valves will be loose, adjust the valves.
On other types of engines I would use a straw and feel for the piston to come to the top on the compression stroke, on this engine you may not want to remove the injector to feel for the piston movement.
So if it feels like you are on the compression stroke and it's hard to turn with the ratchet, try a couple of rotations to get the feel, you are probably very close and safe to do the cylinder's intake and exhaust clearance check. Now do that for the others.
The other thing is doing this you may have an easier time to locate the timing mark. Little patience you might get lucky. Use your wife's white fingernail polish to paint it up for next time.
Just thought of another way; just after the intake valve close, mark the pulley with a piece of tape and note it's location, then keep rotating until the exhaust valve just opens. Keeping an eye on the pulley and tape mark and note where it is now, rotate it back half that distance and you would be very close to TDC as well.
Anywhere close to TDC and both exhaust and intake valves are always closed and you are okay to check clearances.
I always bring each cylinder to TDC using the intake valve open/close sequence and then piston to top and adjust that cylinder's valve.
The attached instructions allow other valves to be adjusted. I'm old school.
More work but never wrong.
Good Luck.
I can't think of a way to do the valves without seeing the mark other than this;
While turning over the engine, watch for the intake valve to open, go down, and then close, come back up.
As you rotate the engine further the piston is on the compression stroke and coming to TDC when it reaches the highest point, and the power stroke begins as the piston goes back down. In other words you are at TDC (top dead center) and both intake and exhaust valves will be loose, adjust the valves.
On other types of engines I would use a straw and feel for the piston to come to the top on the compression stroke, on this engine you may not want to remove the injector to feel for the piston movement.
So if it feels like you are on the compression stroke and it's hard to turn with the ratchet, try a couple of rotations to get the feel, you are probably very close and safe to do the cylinder's intake and exhaust clearance check. Now do that for the others.
The other thing is doing this you may have an easier time to locate the timing mark. Little patience you might get lucky. Use your wife's white fingernail polish to paint it up for next time.
Just thought of another way; just after the intake valve close, mark the pulley with a piece of tape and note it's location, then keep rotating until the exhaust valve just opens. Keeping an eye on the pulley and tape mark and note where it is now, rotate it back half that distance and you would be very close to TDC as well.
Anywhere close to TDC and both exhaust and intake valves are always closed and you are okay to check clearances.
I always bring each cylinder to TDC using the intake valve open/close sequence and then piston to top and adjust that cylinder's valve.
The attached instructions allow other valves to be adjusted. I'm old school.
More work but never wrong.
Good Luck.
Attachments
Last edited:
Thanks a bunch, SpudHauler. I think using your methods to zero in on where the timing marks ought to be will be very helpful. I'm going to try to give it a whirl (no pun intended) later today. And, once I do find the marks, painting them up for next time is also a great idea. I let you know how I come out.
RealtreeRTV
Member
The purpose of setting up on timing marks when adjusting valves is to make as few rotations as possible.
Sometimes its more of a headache to do it that way.
When an intake valve on one cylinder is open (pushed down) the exhaust valve for that cylinder is fully closed (or on the base circle of the cam lobe for that cylinder.)
I adjust that (closed) valve and log or mark it down and go to the next valve that is fully closed and will slightly turn motor over until i get through all of them. You should be able to wiggle rocker on the closed valve also and keep in mind you should never have to make any drastic changes to adjust a valve, you are just tweaking to maintain a certain tolerance.
The valves will line up with the passage in the manifolds, so you have to be very careful to know which are exhaust and which are intake valves. A book can also clarify this.
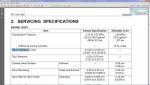
This is because the clearances are usually different for either intake or exhaust. (I see from the chart above that clearance is same for int. and exh.,that makes it easier)
You can remove the glow plugs to make the engine easier to turn over.
(blow top of motor off good before you get started to minimize the chance of getting dirt into motor.)
Hope this helps!
While I have adjusted a lot of valves in my life, I haven't needed to adjust the ones on my RTV900 yet, but I did stay at a Holiday Inn Express once.
Sometimes its more of a headache to do it that way.
When an intake valve on one cylinder is open (pushed down) the exhaust valve for that cylinder is fully closed (or on the base circle of the cam lobe for that cylinder.)
I adjust that (closed) valve and log or mark it down and go to the next valve that is fully closed and will slightly turn motor over until i get through all of them. You should be able to wiggle rocker on the closed valve also and keep in mind you should never have to make any drastic changes to adjust a valve, you are just tweaking to maintain a certain tolerance.
The valves will line up with the passage in the manifolds, so you have to be very careful to know which are exhaust and which are intake valves. A book can also clarify this.
This is because the clearances are usually different for either intake or exhaust. (I see from the chart above that clearance is same for int. and exh.,that makes it easier)
You can remove the glow plugs to make the engine easier to turn over.
(blow top of motor off good before you get started to minimize the chance of getting dirt into motor.)
Hope this helps!
While I have adjusted a lot of valves in my life, I haven't needed to adjust the ones on my RTV900 yet, but I did stay at a Holiday Inn Express once.
Last edited:
Thanks again, fellows! I just got back from a mission complete sortie. Here are my lessons learned:
1. Turning the crankshaft with a ratchet wrench on the nut at the front of the engine is the way to go. Duh! I don't know why it didn't occur to me. I was able to get a ratchet on the nut and turn it at will with minimal scratched knuckles and punctures to the forearm.
2. I was able to locate the timing marks! Yea!!! Since I was able to do a more controlled turning of the crankshaft, I was able to make a closer inspection and found the mark. I couldn't really see the "1TC" but I could see the scored mark across the full thickness of the flywheel.
3. Turns out that my wife is apparently not the fashionista that SpudHauler's wife is -- my wife had some what appeared to be white nail polish from my view, but it turned out to be a frosty translucent stuff that only somewhat marked the spot for my future reference.
4. Breaking lock nuts loose on valves is always a knuckle buster. I also got a small cut to my thumb when one of the the nuts broke loose. I guess that's just part of it.
5. My valves were sloppy loose. The thinnest feeler gauge I had (I know, I should have checked before starting) was 0.203 mm. The manual says the clearance should be 0.145 to 0.185 mm. I was able to get the 0.203 mm in all of them with room to spare. So, I just tightened the screws until it was tight on the 0.203 mm gauge. Now that I know how to do it, I suppose I will get the correct gauge and do it again sometime.
6. It does seem that my engine is a little quieter now but I was never good at judging increases and decreases in a sound like that. Surely it is some quieter because I know I tightened all the valves about 1/4 - 1/2 turn of the screws.
7. The service manual tries to be clear about which cylinder is No. 1, but in doing so, they confused me (not difficult). They say that cylinders are numbered starting from the "gear case" end. On first reading I took that to mean from the transmission end, which would put No.1 at the back of the engine. But the pictures and diagrams don't work if that is the case. So, I conclude that what they are apparently calling the "gear case" is something on the front of the engine?
Anyhow, thanks to SpudHauler and RealTreeRTV for your help. I am now a qualified RTV valve adjuster, scratched and nicked up though I may be.
The adjustment was .005 to .007 th and you are at .00799 or .008 th
Knowing that I would have made them a tight 8 th with your gauge.
Don't go back and re-do them.
For all the work, blood, sweat and tears, YOU ARE GOOD TO GO.
Good Job.
Knowing that I would have made them a tight 8 th with your gauge.
Don't go back and re-do them.
For all the work, blood, sweat and tears, YOU ARE GOOD TO GO.
Good Job.