New Rear U Joints Needed-- Again

bordercollie

Gold Site Supporter
Gold Site Supporter
Thank you Herman and Two Guns. :)
A lot of ya'll probably don't remember this, but way, way back in 2005 when the forum was first around and called compact tractor review,.. I had problems with my bota and Two Guns literally saved me a huge bundle of cash with his advice on a repair and then at least $500 when I bought this 2011.. I have to say that I would have never had the courage to try repairing the 2005's u joints ( and therefore these) if he had not be so positive about me being able to handle it. Many thanks Two Guns . :tiphat: collie
 

bordercollie

Gold Site Supporter
Gold Site Supporter
After I had the axle laying on the concrete and a couple of old towels, I get the 2 lb shop hammer.While protecting the threaded shaft with nut screwed on even with the end of the shaft and then holding a 2x2 there to aid in protecting those shaft threads, I give a good rap. The shaft started moving after a couple of hits. ( I love that penetrating fluid!) I was prepared to put a "stop on the other end of the bumper to prevent crawl but my foot was all I needed. both ends came out . However, I did use a large punch on the final one. I just made use of the center whole in the shaft and it just took a lick or two and, pop, out it came. Now it moves to the work table for the real work to start.. I clean up the joints so I can see and remove the inner clips and soak the caps all around inside and outside with penetrating fluid - overnight is good. Next step for me is removing the inner joints while these caps soak. bordercollie
 

Attachments

  • 0714151413.jpg
    0714151413.jpg
    92.7 KB · Views: 242
  • 0714151414.jpg
    0714151414.jpg
    103.2 KB · Views: 241
  • 0714151326.jpg
    0714151326.jpg
    107 KB · Views: 243

bordercollie

Gold Site Supporter
Gold Site Supporter
Continued from earlier>>>>
The inner joints have a sealant between them and the transmission. It is aluminum so I was really careful as I worked a good thin putty type knife in between where they meet. I did this from underneath because there was more working room. I gently tapped the handle of the putty knife and they started separating. that was good. so scratches on that aluminum since I was gentle with it and had a thin and clean putty knife. (I am using a pointer in the picture) I start pulling out the inner joint section and the springs were just barely in the way of the joint clearing enough to come out. I get my floor jack and give the springs the slightest nudge up and the joints clears. ahhh.. relief...
I see a bearing on the inner side of this joint so get a baggie to cover to make sure not to get dirt etc in it. I remove the clips and spray the caps inside groove and outside on top with the penetrant. They will soak and are flipped while I work on the outer joints from the previous soaking.
A vice can be used to remove the u joint's caps ,along with sockets, to help ease them out, but I used a gigantic nut I found and a socket and just sat them on my late Daddy's steel work table. I positioned the joint so that the bottom of the cap would be clear and placed a socket on the top joint cap . I made use of the shop hammer and more penetrating fluid. Slowly and then quickly they popped out.. To get the opposite caps out,Repeat .. I had to use a pair of vice grips on the last cap out as it would not quite clear completely. Do not bend the yokes though. Make the hammer blows accurate.
I made sure to keep one old assembly intact and put the new joints in the " just removed caps" one . I'd never tear them all down at the same time. This gave me a model so that I wouldn't get the joints mixed up... I need all the help I can get haha .. It even helps in positioning the grease joints in the right direction and the orientation of yokes as well. Those yokes have marks ( diamonds on one side and an H on the other) I put them back the same to be safe.

bordercollie
 

Attachments

  • 0714151139.jpg
    0714151139.jpg
    127.9 KB · Views: 237
  • 0714151142.jpg
    0714151142.jpg
    110.9 KB · Views: 235
  • 0714151528.jpg
    0714151528.jpg
    116.2 KB · Views: 233
  • 0714151954a.jpg
    0714151954a.jpg
    99.1 KB · Views: 233
  • 0714152006.jpg
    0714152006.jpg
    144.8 KB · Views: 237
Last edited:

bordercollie

Gold Site Supporter
Gold Site Supporter
Thank you Avantiguy. I'm just showing how I did it. Some things I do or did may not jive with other folks ways, I just thought it would help people who need some pointers . Also I caught a typo just now-I should have said so "NO" scratches in the aluminum (when I was separating the inner from the transmission) in the last post.
Also in the latest post, The culprit joint cap is visible in one of the pictures. It was the only one that was "bad" but it is the achille's heel... collie
 

bordercollie

Gold Site Supporter
Gold Site Supporter
continued

After flipping the joint over and removing that cap, I used a punch on the "indent " that was now visible with the cap removed. and drove out the other cap the same way. Repeat on the other side. The vice grips came it handy a couple of times though. I did notice that one cap just would not budge so drove the other way and saw a burr there on the end of the yoke. I took care of that and put a little grease on the inside of the yoke and then worked it again. It came out fine. The I decided to give all the remaing yokes this treatment, even though they had been "pre lubed" with penetrating oil. I drove the old caps a bit added the grease flipped and drove back. This helped them come out easier (in my case).
I got the caps removed and the joints out. Cleaned them up and did as Art suggested a few posts back and put some anti seize in the yokes. I took a look at the other original, old assembly there in front of me and put the "new " one back the same way. I noticed that each yoke had a either an H or a diamond on it above where it is attached to the shaft. I didn't take any chances, and put them back the same way as they were before.(Mine were all alternated - H meets Diamond and never H -H nor D- D - I thought better safe than sorry ) . I held my breath when putting in the new joints and caps because I sure did not want to mess up those new cap pins.. The pins on the inside of them need to be lined up just right or they can fall over and cause much grief. Careful, Careful. I used the vice in putting these new caps in so there would be no jarring and less chance of the pins messing up before engaging the joint. I just used sockets and closed the vice slowly. Make sure that You can see the groove for the joint clips on the caps just inside the yoke. After done, I put on the clips. Hold them firmly and maybe wear some eye shields. (The first time I did this to the '05, I had a clip pop across the room.) I also made sure they would "seat" . I just took a clip pushed it around the groove and saw that it would really fit the groove and not just sit on top. I then just tapped it in. It is a good feeling when it snaps in place.
By the way , It really helps to have rigged up something on the vice to "hold" one of those sockets ..
After I get the joints all in and the grease fitting oriented like on the original I grease that puppy. I work it back and forth and grease a bit more. I do the same thing for the remaining assemblies.
Now that pesky boot is in the way and I want to look at that shaft on the outer assembly. I have 2 old spring clamps so use them to pinch the boot back (takes 2 clamps or they will probably slip off) to view the shafts. See the "missing spline" we all talk about and decide to do a dry run on putting the 2 together. Well they will just not go together. I look at the phasing charts of Mark's and Kanook. I have it right but it will not go together. Then, I notice that I am trying to put the 2 H yokes together .. still correctly phased but HH.. Nope won't go... I flip over this dry run and still have a correctly phased but H to Diamond and now it slides together just fine. I try this with the other pair and the same thing happens. H to D is phased and good but H to H is phased and won't . So I make an extra mark on the shafts with the HD pattern used.
I remember reading about needing to let the sealant cure for 24 hrs before adding fluids so go ahead and get ready to set up the inners.
More later.. bordercollie
 

Attachments

  • 0716151318.jpg
    0716151318.jpg
    81.8 KB · Views: 216

bordercollie

Gold Site Supporter
Gold Site Supporter
continued..
I clean off the old sealant from the face of the inners mounting place using a single edged blade and then a wipe with some gas. all nice and clean now. I apply the sealant according to the brand's directions.
Time for the floor jack ... I put just a on nudge the springs so that the inner assembly will clear and now for inserting the inner. I push the shaft into the transmission and it stops.. no problem.. just work it left to right while pushing inward and it will line up and work inward till it is right. (As I commented in the past, it reminds me of safe cracking ;) ..) Now time to put back the 3 bolts and alternate gradual tightening all around. Remember that this is aluminum and use proper torque so you won't strip the things.. That would be really bad news. I will try and remember to post a chart of torque later..
Alright ! Got both inners done ! The sealant needs to cure for 24 hours before refilling the transmission.
I need to go and finish the axle assemblies..
OK... So I am on the final leg of this project ..ahhhh ! I put the outer assemblies in the bumper and carefully get them started and also put some good grease all in there where it is sealed .. I have a long old bolt and tap on the ear of the yoke in there- not the joint -to get it in position. alternate all around.. (Just because I did it doesn't make it right though) . Every thing goes ok but one shaft needs pulling up more so I only have enough threads showing to use the hub by itself to pull it into place. I put a big screwdriver through one one of the lug holes to hold keep the hub from turning as I temporarily tighten up the castle nut... this brings it into the position I want and so then remove the nut and hub, put on the seal and put it together properly. (see Messick's diagram in previous post) for a detailed picture.
I decide to put 2 cable ties through the 2 of the hub's closest holes to remind me of the position of the yoke and the right phasing...
( I used that big piece of pvc in the picture to put the bearings in without damage)

It's time for me to put back the "bumper axle" . This will either be easy or quick.. Get the web rachets ready and hanging over the round frame brace above. ( I moved them a couple of times and also had them on the square bracing) It depends on the swing room to line the inners and outers..Just have the rachet so you can reach it when manipulating the axles /shafts. I will also put a bungee strap on the receiver to help hold it up but while still allowing "swing". (Ha I used those round up jugs in the pictures to help me get things started since I work alone.)
I take the time to finish up the new filters on the transmission and adding the new SUDT2. I wouldn't want to forget that! Also good to check for leaks in the sealant.. Good - no leaks . Getting ready for the final leg.
Almost finished ! collie
 

Attachments

  • 0716151448.jpg
    0716151448.jpg
    115.6 KB · Views: 195
  • 0716151528.jpg
    0716151528.jpg
    117.8 KB · Views: 193
  • 0716151508a.jpg
    0716151508a.jpg
    90.3 KB · Views: 189
  • 0716151508.jpg
    0716151508.jpg
    122.3 KB · Views: 189
  • 0716151529.jpg
    0716151529.jpg
    95.3 KB · Views: 190
  • 0723151448.jpg
    0723151448.jpg
    73.5 KB · Views: 195

bordercollie

Gold Site Supporter
Gold Site Supporter
continued..
It almost done . :)
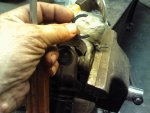
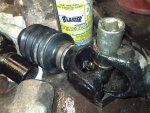
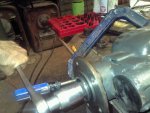
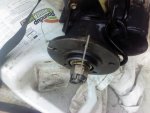
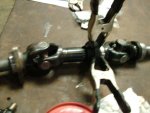
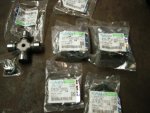
As in the last picture of the previous post, I get the bumper /axle in position and have the phasing marked . ( When I first removed the shafts in the beginning, I noticed a mark on their ends. I guess this was for the factory phasing). The Kubota brand boot crimp bands are preformed in a large circle like a ring and ready to be squeezed... so I went ahead and placed them on the inner assembly. otherwise I would be up the creek after the assemblies were together . The bands kept falling off before I had the assemblies together, so I fixed that with a dab of grease to hold 'em up there, on each side. ( I also has some grease in the splined areas soon to be put together and hidden by the boot)
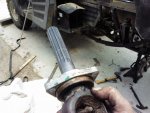
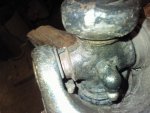
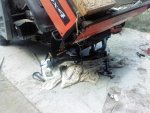
Now it is just a matter of swinging out the one side of the axles, positioning the outer axle to aim toward the inner and positioning the inner joint to "aim to the outer axle, it was soon to meet.". I used the belt rachet to adjust the bumper height to what I needed and brought the 2 together. After just a bit of slight adjusting the axle and inner piece just come together. really nice.. I put my hand up in the hidden part of the axle and felt that the phasing was still right . the boot had also slipped perfectly in position. :) 
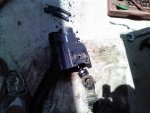
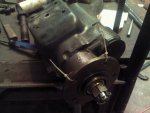
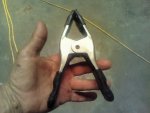
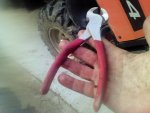
. I decide to go on and secure that boot clamp so the 2 pieces won't "come apart" when I am working with the other side. I use a large pair of "pincher"pliers to squeeze the boot strap crimp piece. I'm not too harsh with it because I know these pliers will also cut if used too forcefully.
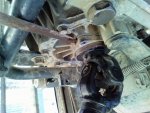
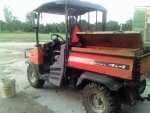
I do the same with the other side and they come together just fine. I touch, I feel, All seems right . I wiggle the boot, it is right so then I crimp it and can see grease come out as the squeeze is made just like on the first side. I know now, very little water can get in there, if any. All done.. So I double check everything: boots, nuts , crimps grease, fluid and let down the bed.. Time for a road test.. All is well . :) :) :) etc.. :tiphat: 
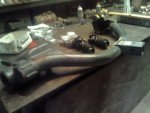
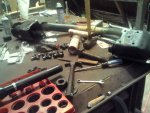
I posted a couple of extra pictures left over here at the end.. ;)
It is important to let folks know that I did this out of necessity to save some money and that I really don't know much so may have done some things considered wrong by the pros. However, it worked for me, so use your judgement when doing things that I did.
I watched my Dad (and Mama) work.. many, many years ago when I was growing up and learned much about how to do things and how to make things a person needs,..how to think out of the box so to speak... I enjoyed and now even today, miss very much, my times with both my Mama and Daddy. They grew up in hard times that would bring tears to many today..but they were always honest and treated people right. That's what I want to do and, the Good Lord willing , try to do whenever I can. bordercollie
 

Attachments

  • 0716151945.jpg
    0716151945.jpg
    83.7 KB · Views: 187
  • 0716152006.jpg
    0716152006.jpg
    107.8 KB · Views: 185
  • 0716152014.jpg
    0716152014.jpg
    115.1 KB · Views: 182
  • DSCF4918.jpg
    DSCF4918.jpg
    47.7 KB · Views: 183
  • DSCF4909.jpg
    DSCF4909.jpg
    57.9 KB · Views: 187

bordercollie

Gold Site Supporter
Gold Site Supporter
I just remembered to post this information on torque. bordercollie
 

Attachments

  • 0801152047.jpg
    0801152047.jpg
    75.9 KB · Views: 133

lazya504

New member
Anyone replaced their rear propeller shaft with a generic one? The oem part number I need is K7711-12334, but costs 375.
I'm looking in particular at this rhino brand for 200 , but dunno if it's any good.
 

Mark.Sibole

Well-known member
I believe i seen someone here replace the shaft with possibly the rhino one.If I remember correctly they said it was a very good quality and went in no problems and it is a lot cheaper than a Kubota OEM shaft.
Im about realy to tear mine down and replace the 2 outter joints before they get to bad and get it ready for plowing season.
 

bordercollie

Gold Site Supporter
Gold Site Supporter
I agree with Mark- I think I read the same thing on a thread here. This is the only forum I frequent . Back when I reworked my 2011 xt, I saw those that you mentioned on that site,they were listed as not fitting my 2011xt 900 so I just replaced the ujoints and that was many hours ago. I have pictures of that on this thread- The most recent posts on this thread were the replacements on this 2011. The beginning of the thread years ago was my first attempt of 100 % on my own replacement . I had a wad of trouble getting out the shafts on that 2005. . It was a much easier the last time around and pictures are better too.
bordercollie
 

Mark.Sibole

Well-known member
I frequent several forums and have to honestly say this is the best onf for info and usually the info posted here ends up on other forums.Evidently we are the pioneers of things.Ms Bordercollie is a wealth of info and im no slouch either but we all work together to get out the best possible info for all to save as much money as we can.Like I said im about ready to do my seasonal inspection and generally always replace my upper u joints as they seem to take the brunt of the abuse.I have been lucky as to have never had to replace the lower or innser U joints on my machine.But the upper joints closest to the trans seem to get all of the abuse.I figure if Im tearing it down for inspection I might as well add new joints in the upper.This season as I know I do have 1 hoint that always seems to go bad Ill kave to MIC the yolks on that shaft to see if I have any slop.I may have to break down for a rhino shaft myself if the yolks are damaged or slotted.It seems the one that goes bad is always the same one so something is going on in there.Hopefully I can get away with a U joint.I like to inspect this seasonal as I feel its easier to do especially when you are going to replace or change the hydro fluids anyways.In the past I have pulled things apart and took the shaft to a friend as for the life of me I have NO luck doing U joints period.I always seem to loose a needle every time I attempt it.But this time as the one who does this for me is so tied up in work and life I may have to do this myself.I may even pick up a gold plated Kubots joint to see if it remedys the failure.I wish Ms Bordercollie lived closer to me to help my old ass out.But I can say with out a doubt she is one of the nicest people you could ever meet and always goes well out of her way to help everyone out.Im truely blessed to have met her and she has become a good friend to me.If I had to say of all of the people here she is the kindest and most knowlegable person on this forum.God Bless her soul!!!!Good luck on the repair and I think if I can do this with my Multiple Sclerosis and generally do it all by myself anyone can do it.
God bless and Ms Bordercollie huggsssssss my friend.......
 

Mark.Sibole

Well-known member
PS actually as I didnt know how late it was to call them I just dropped them an e mail to see if they sell only a half shaft or if you have to purchase a whole shaft.Im hoping and praying they can sell just the half shaft or inner shaft.Ill report back with the answer when I get it.
Have a safe weekend all.
As soon as im feeling better from a long summer of MS issues Ill have to get mine torn down and get it ready for winter as the OL farmers alimanac predicts colder then normal winter and a lot more snow than normak for the winter here....
 

ovrszd

Well-known member
I've replaced a gazillion ujoints. I use a vice. My Son has also replaced a gazillion, he beats them together. We rarely have a problem. Guess we've had plenty of practice!!! :)

So far I haven't had an issue with my RTV but certainly will. So I follow these threads closely and try to absorb as much experience as I can.

Look forward to hearing your solution and direction.
 

bordercollie

Gold Site Supporter
Gold Site Supporter
Thanks Mark. :) I consider you a great friend too. I've been in Arkansas with no internet -scraping and painting on the house, or would have responded sooner. I find that a smear of grease helps hold those pins in place till I get them lined and squeezed in the vice . collie
 

lazya504

New member
Hey anyone got any tip on removing the outer shaft? I removed the castle nut and the washer , and tried hammering it out but it won't budge.
 

Mark.Sibole

Well-known member
hey get stuck very good.Try spraying it with pb blaster or some other penetraiting oil and try it again.If you have access to a press or an air hammer it will pop out.
 

bordercollie

Gold Site Supporter
Gold Site Supporter
What model do you have?
If you have a 900 like mine which was a 2005 and now a 2011 xt, You have to take off the entire bumper tube and that is documented in the early posts on this thread. I had a devil of a time as did Mark getting out the shafts and finally had to use a press. This was the 2005 year model. The penetrating fluid will definitely help. I stood my 2011 upright for the fluid to soak down and then laid it down to direct the shop hammer blows. They just popped out with those protected blows -to keep from damaging the threads on the shaft. It was the 2005 that gave me such grief on removal.
You will need to be sure and phase the replacement ujoints so they won't vibrate. There are a couple of drawings on this thread for doing that or you can make sure that you replace the u joints ( both assemblies) on the shafts just as they came off. bordercollie
 
Top