New RTV X1140 wheels, tires, lift questions

Island Runner

New member
Hi All,

First post here and hopefully I don't come off as ignorant on the RTVs. I have a few questions and will add some backstory so hopefully this isn't too long of a post.

I recently purchased brand new 2023 RTV X1140. I have about 800 acres of farmland, 40 acres of wooded swamp, 35 acres of wetlands, and about 12 acres of water in 5 ponds. The terrain is varying to say the least. I have steep dam walls around that separate the swamp land from the fields, I have grasslands, I have mucky swamp land that is always wet, I have wooded swamps, and I have woodlands. I hunt, fish, cut firewood, and maintain all of it and obviously need to access it in rain, snow, etc.

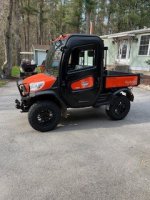
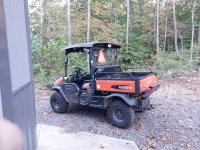
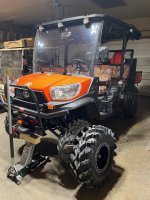
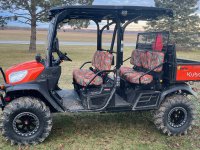
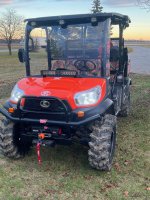
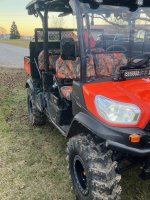
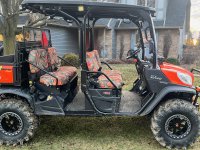
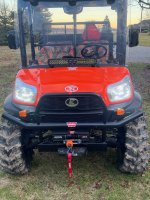
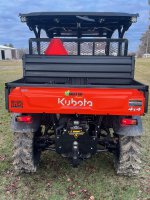
That said, and I have searched 50+ pages in this forum, but for a definitive answer what is the largest wheel and tire setup we can put on our RTV's? With the 2" lift and without the lift? I have attached a pic of RTV on 30 inch wheels for reference but have not been able to get any answers on how it performs with 30's. Any rubbing at full steering lock? Any rubbing when bottoming out suspension travel? I have seen 28" is the largest with a 2 inch lift and I have seen 30 inch is the largest with 2 inch lift. I come from building lifted big block V-twin golf carts and can see how the larger tires affect top speed and low end torque to a degree but that is with CVT transmissions. How does the HST transmissions handle bigger tires? I would think being hydro the effects of losing losing low end torque would be relatively small compared to CVT type drives but wondering if anyone has had a noticable decrease in low end torque/towing capacity from the larger 28" and up tires?

Along the same lines, how does the HST in these RTV's handle big mud tires? Can they turn the big lugged tires fast enough to get them cleaned out or are mud tires like the STI Outback Max and Interco UTV Bogger overkill for a RTV? I have been looking at those tires as they seem to be a good mix of mud tire and big lug tractor tire for maximum pulling force. Like I said, I need maximum ground clearance for the woods, mud tires for the swamp, and excellent traction for pulling. I will add that the machine rarely sees pavement. I do not plan on doing heavy deep mud bogging with it by any means but know inevitably I will caught in some deep muck from time to time. I do have about a mile of paved road I get on every now and then to get to one woods if there are crops in the field but I usually take the ditch anyway. I do not care about paved road performance or longevity. I honestly have not found a place to get it stuck with the factory ATV tires yet but this year has been exceptionally dry and the ponds are the lowest I have seen in 15+ years. I bought this machine to work and access all my land I can. I have other toys for speed and fun but they cannot work. Anyone have any insight or advice on any of this? Thanks!
 

Island Runner

New member
The above pic is not my machine. I saw it on a Facebook post in a Kubota group of some kind. It states that it has the 2 inch lift and 30" tires but nothing else. I messaged the Kaige Kubota dealer that has the sign in the background but have not got a reply from them on how it performs. Thought I'd ask here and see if anyone else has done this and how performance was affected.
 

Doc

Admin
Staff member
Gold Site Supporter
I have no experience with a setup like you are asking about.
From what I know of the RTV I would think the extra weight and power needed to turn tires like those would impact overall performance. Top speed might be 15 to 18 instead of 22 to 25. Just a guess.
 

Smilingreen

Active member
I have no experience with a setup like you are asking about.
From what I know of the RTV I would think the extra weight and power needed to turn tires like those would impact overall performance. Top speed might be 15 to 18 instead of 22 to 25. Just a guess.
What true speed are you getting out of yours, Doc, with the larger tires? Also, I would think the 1100 would feel more tippy, raising the center of gravity like the picture the OP posted. I am still getting used to mine with the full cab, compared to what my old 855D Gator felt like in sharp turns at speed and on the sides of hills. The Kubota is actually around 1.2 inches wider than the Deere, but overall height of the Kubota is higher and the weight of the steel cab with all the glass raises the center of gravity.
 

Doc

Admin
Staff member
Gold Site Supporter
What true speed are you getting out of yours, Doc, with the larger tires? Also, I would think the 1100 would feel more tippy, raising the center of gravity like the picture the OP posted. I am still getting used to mine with the full cab, compared to what my old 855D Gator felt like in sharp turns at speed and on the sides of hills. The Kubota is actually around 1.2 inches wider than the Deere, but overall height of the Kubota is higher and the weight of the steel cab with all the glass raises the center of gravity.
I was able to do 24 on flat pavement the summer of 22. This past summer I would only get 22. Considered going through the tuning exercise that Aurthuritis posted a couple years ago. But I have not done that yet. Nothing changed so no clue why it was slower this year.
 
Last edited:

DDS

New member
I have an X1100C with a 2" lift. I have 235/75r15 (roughly 29") tires. At full lock, the rub slightly. I still get 24+mph, prob more now since the speedo is off. I went with an "automotive style" tire because I don't like the rounded look atv/utv tires offer. I also wanted a higher weight rating.
 

Attachments

  • kubota 3.jpg
    kubota 3.jpg
    33.5 KB · Views: 27

Ohio_Pawpaw_Grower

Member
Site Supporter
Based on recommendations from many members, we installed Blackwater Evolutions 26x11x12 with no lift. I have heard of folks successfully installing 27" with no lift and no rub. For me, I wanted to maintain complete suspension articulation in any circumstance because our land is like yours. There are several places where we transition from one trail to another where there are substantial angle transitions. I did not consider a lift kit because it would throw off the suspension geometry and probably make it a little scary. Right now I can take it anyone on our place with confidence. If you want a good balance for the 1140's longer wheelbase, try the tire of your choice in 27" (I recommend radials) and take a pass on the lift kit for now. Get some more cockpit time and if you really feel it needs to be taller, you have the option. Lastly, not sure if your rims are the purty aluminum ones or black/grey steel. The aluminum rims on our 1120 were coated in red clay mud one week after we got the unit. I bought some factory grey steel ones on which to mount the BWs and very happy with that combo. I cleaned up the aluminum rims an put them on a shelf for parades. The 1140 is a great choice, I hope you enjoy it and get many years service. Be vigilant about your maintenance.
 

Attachments

  • 20231007_180430.jpg
    20231007_180430.jpg
    7.2 MB · Views: 13

Island Runner

New member
Thanks for all the replies everyone. Thought I'd give a little update on my X1140 build. I ended up installing the Demon 2" bracket lift. For wheels I went with 14" MSA M31 Lok 2 Beadlocks. For tires I went with 30"x10"-14" STI Out & Back Max tires. I have attached a pic of before I got the wheels/tires mounted on the machine as that was the only pic I had in my phone. I will get some more pics this evening and post them up tomorrow. It all went pretty smooth but had some rub which I will detail in a bit.

I measured height to the bottom of the front bumper and bottom of the rear hitch as baselines with shocks at max preload and at minimum preload. I did the same with the Demon 2" lift and factory wheels/tires as well as with the 2" lift with the 30" tires. I originally drove it with the 2" lift and 30" tires with shocks at minimum preload. This was so I was able to clear my garage door header! I measured and measured again and knew I was going to be damn close to not being able to make it out of the garage at full suspension preload so I tried it at minimum. I had little bit of rub in the rear but it was only on the lower outer bolt head that bolt the fender to the frame and some rub on the lower part of the fender flare. No rub in the front. I then wanted to see how close I was to fitting out the garage door with suspension at max preload. I was able to get out but it rubbed the header trim. I drove it like this for a few days and had occasional rub in the rear on real off camber situations with 4 adults on board and a few hundred pound of gear in the bed.

I then set out to fix the rub. I cut the lower 6 inches of the fender flare off at an angle to the body and that solved that rub. Then I stared at it for a few days taking body and fender panels off as I was going to cut the frame and weld in a new frame and plate at an angle and shorten the inner fender and replace it with steel sheet. And as much as I know it's a wrong thing to do, I decided simplest solution was best for now and just took a grinder to the bolt head. Took about 1/4" off it and left just enough that it is still holding fine and I can get a pair of vice grips on it to remove it if ever needed. That solved all my rub! I have tested it in almost every load and terrain situation I could find and even with 5 adults and a few hundred pounds in the bed I was unable to get any rub anywhere. I will note that I adjusted out the bolts that limit the steering angle in anticipation of rub in the front but I will move them back a bit as I feel I went a bit too far and can go back in some.

As for loss of low end, it may be a bit slower of the line in a holeshot but only for the first 10 to 15 feet or so. After that, I notice no loss in power or low end torque. I do know my speedometer is way off now. It will only get to 17-18 MPH on the factroy speedometer but that turned out to be 24-26 MPH on GPS. Tires feel choppy and bumpy at crawling speeds on concrete but are smooth as can be offroad or on the road at speed. I have settled on suspension preload at max on the rear and 1/2 on the front. It took some time and patience and few cases of beer but I am really happy with the results. I have noticed no difference in low end torque as I have pulled the same loaded trailer, drug big logs around, climbed any steepness of incline I dared to try, and drove over huge logs and rocks and creeks. I'm satisifed for sure but if I did it all over I would go with 28" tires. At least 28" tires in the style I have. They are really "flat shouldered" if that is the correct description and have huge lugs that stick out from the sidewall. I feel a 30" tire in a more rounded ATV style tire like the factory tire would not rub anywhere.

I would also like to note that I installed 2 inch wheel spacers on the rear and 1 inch spacers on the front but after testing I remmoved all the spacers as they were not needed at all. I actually wish I could remove the factory spacers as I feel they are not really needed either. I left them on as I would need to replace the factory studs to do so as they are not fully threaded hence the lug nuts not being abe to tighten my specific wheels. Maybe a thicker walled wheel would work but I highly doubt it. For now, I have left the factory spacers in the front and the rear. I will post up more pics tomorrow and give the height measurements in different configurations as I wrote them all down on the wall in my garage. I do know that the rear is at least 4.5 inches higher now and the front is at least 4 inches higher. It is a noticable change for sure but has never felt unstable or tippy and believe me when I say I have tried this configuaration in every angle, scenario, and terrain I have on my land. I will say the tires are not soft yard friendly and drag alot of mud into the garage!
 

Attachments

  • X1140 with lift before 30 tires.jpg
    X1140 with lift before 30 tires.jpg
    956.6 KB · Views: 22
  • Like
Reactions: Doc

Island Runner

New member
I for got to add that even though I went in and out of my garage several times at full height but I did manage to rip off all the garage door weather stripping of the header! I then removed the 1" thick cedar board header trim and cut 1 inch off the header 2x12's. I then trimmed it out in 1/4" thick UHMW polyelethene sheeting. I gained about 1 3/4 inches in header height but to my amazement it still rubs the header as I pull in and out. That is why I UHMW polyethelene sheeting. It is slick and very abarasion resistant. I now just slide under as I go in and out. My wife was not as pleased at the results as I was but she will learn! Drastic times call for drastic measures!
 
  • Haha
Reactions: Doc

Island Runner

New member
Good morning all, here are some pics of my 2023 RTV X1140 with the 2" lift and 30" tires. One thing I forgot to mention in my last post yesterday was that I did notice the more you crank up the suspension preload and the more you lift the machine, the more positive camber you get in the front. As we all know there is no way to adjust camber on these machines. It was not a terrible amount of positive camber but noticable by looking at it. I have not measured how many degrees of positve camber the lift and preload induced but I could see it in both the factory wheels and tires and the 30" tires. I imagine you can see it in the pics but like I said, it is not much but noticable by eye if you look for it. I don't believe this has any negative effects as I have not noticed any wierd tendencies as I use the machine. I imagine it would be noticable if the machine went 70 MPH or something but being this machine doesn't go that fast I'm really not going to worry about it. My OCD does get the better of me and even though it is only a few degrees of positive camber, my eyes are just drawn to it every time I look at it. It's is what it is and I have accepted that it is just going to always have a few degrees of positve camber in the front. None of my buddies or wife have noticed it or said anything about it but I notice it. Just throwing that out there for others with OCD that the more you lift the more positive camber you will induce. Any questions, just ask.
 

Attachments

  • RTV X1140 1.jpg
    RTV X1140 1.jpg
    1.1 MB · Views: 29
  • RTV X1140 2.jpg
    RTV X1140 2.jpg
    1.1 MB · Views: 26
  • RTV X1140 4.jpg
    RTV X1140 4.jpg
    1.1 MB · Views: 23
  • RTV X1140 5.jpg
    RTV X1140 5.jpg
    1.2 MB · Views: 22
  • RTV  X1140 3.jpg
    RTV X1140 3.jpg
    1 MB · Views: 21
  • RTV X1140 6.jpg
    RTV X1140 6.jpg
    996.6 KB · Views: 27

Island Runner

New member
Well, just a quick update on my X1140 build. I got all my gauges wired up and attached a pic. I installed the following gauges as idiot lights are not my style.
Tachometer
Boost
EGT Temp
Oil Pressure
Oil Temp
Water Temp
Trans Temp
Volts
A Clock for telling time!
Next project on the X1140 is a turbo. I ordered the turbo kit yesterday and hopefully should have it by the weekend. I plan on doing the turbo install and finishing up a few sending units for the gauges (Boost and EGT) while I have things taken apart for my 50 hour service. I am cuurently at 44.9 hours and the weather here is supposed to be snowy and wet for a few days then get super cold. That said, I was hoping to get the 50 hours on the machine by the weekend but doesn't look promising. I may just do the 50 hour service at 44.9 hours and get the turbo installed.

If any one knows what the 3 screws that are near the injection pump are and the cause/effect of adjusting each one individually are, please see this thread I started a few minutes ago asking about them. https://www.nettractortalk.com/forums/threads/injection-pump-and-governor-adjustment-on-d1105.19588/
 

Attachments

  • gauge pic.jpg
    gauge pic.jpg
    891.8 KB · Views: 22

Island Runner

New member
OK, here's the update. Just finished up the turbo installation and fueling adjustments. Also did the HST optimization procedure and adjusted the charge pressure and the high pressure relief.

As for the fueling adjustments I made, and as a reference to my other thread asking what the 3 adjustment screws are and what they do, I will try to explain it here.

Screw #20 = Fuel Rack Limit adjustment - Limits how far the fuel rack can be pushed by the governor under load when the RPM drops. Right now I am at 1 turn out from the factory setting and there is slight smoke under load. May adjust further out as I get more hours on it and get a better feel for it.

Screw #65 = Max Fuel adjustment - This screw limits the max amount of fuel the injection pump will deliver. I have no idea as to where the factory setting was. When I finally got the tamper proff sleeve off, the screw and jam nut were loose. I set the screw to 0.650" from end of screw to copper washer as one set of the instructions states. These instructions say that adjustments are case-by-case and even though the machine is running great right now, I'm sure I will adjust it further out as I go.

Screw #120 = Intermediate Governor Screw. I'm really not sure what this does yet. In one set of instructions it said to back it out 2 1/2 turns so thats what I did.

I also advance the injection timing about 2 degrees by taking out the thinnist shim. I feel I could advance it another 2+ degrees but I was left with only 1 shim, which is the thickest one with no holes so I left it in place.

I adjusted the charge pressure in 1 turn as set of instructions said to turn it in 1 to 2 turns. I went one turn but as of now, I do not have s set of Test Guages so in the future I will turn it in some more when I get guages. I really didn't notice any change in HST performance but for whatever reason, shifting from high to low to reverse is much, much smoother. No more stomping brake and tapping the throttle to get it to shift. It is smooth. Not really sure what made it smoother but I like it.

I also adjusted the high pressure relief and turned it in about 3/4 of a turn. Again, no real noticable difference. Again, when I get some test guages, I will revisit the HST adjustments.

As for the turbo installation, I can say this was a really nice and well thought out kit. It was from turbokits.com and actually went together smoothly. The engine bay does get pretty tight and the hardest part was figuring out how to get the nuts and bolts tightend up on the exhaust manifold, turbine housing to exhuast manifold, and a few other places. It trial and error, tighten down this and loosen it up again to tighten something else. It was a bit frustrating at times but get creative and you can figure out how to get it all tightened down.

As for the fueling and HST adjustments, I took instruction from 3 different kits and did all the adjustments they all stated to do. I believe adjusting everything made a huge difference. The machine runs amazingly well and the difference it quite noticable. Like I said, I will continue to make adjustments as I go and get a better feel for it in a working environment but in the brief testing I did last night, all was perfect and well within the parameters I was expecting. Here are my findings.

EGT's never got above 900 degrees. I was not loading the engine to its full ptotential by any means, but I feel with EGT's that low, I can up the max fueling quite a bit yet.

Water and oil temps never got above 180 degrees. Again, it was 20 degrees outside and I was not loading the machine to it's max and only ran 3 miles in the brief preliminary testing last night.

Boost was running about 5 PSI at full throttle in neutral. On the road, at full throttle I was seeing 9 PSI. Again, this is just the machine driving down the road and not putting a real load on the engine. I am guessing by loading the engine, I will see 12+ PSI but that is specualtion at this point and more tuning/testing will be done.

Here's the best part. THE SOUND! It took about 20 minutes for the turbine to "break in" if that is the correct term. For the first few starts and tests, the turbine would only spool up at about half throttle, at least the the point where you could hear it. At low idle, 1500 RPM, it was not producing any boost which I expected. After about 20 minutes of running the engine and keeping an eye temps and smoke levels etc. the turbo seemed to "loosen up" and was whistling at low idle. Right now, it is making 0.75 - 1.0 PSI of boost at 1500 RPM which is surprising to me. It does sound awesome though. The short open muffler connected to the short downpipe really lets the whistle come through in the exhaust note. It makes me smile just listening to it. At full throttle it sounds like a jet engine. I am no stranger to turbo diesels and even though my F350 is deleted, big turbo, tuned to the max, 5" straight exhaust with no muffler, and making about 700 HP, this little Kubota sounds better! Im chalking this project up as a BIG WIN!
 

Attachments

  • Capture.PNG
    Capture.PNG
    116.1 KB · Views: 13
  • RTV X1140 Turbo Installed.jpg
    RTV X1140 Turbo Installed.jpg
    3.6 MB · Views: 9
Last edited:

Island Runner

New member
Forgot to mention that through this entire process the top speed has never changed. It was 24 - 25 MPH on the factory dash before any mods. After the lift and tires the dash would read 16 - 17 MPH and was 24.4 - 24.8 MPH on GPS. After turbo install it ran 24.8 MPH on GPS top speed last night. I knew I would not get more top end from the machine but it was suprising that speed never changed through the whole process. I was told by so many people that I would lose top speed with lift and big tires as the machine just doesn't have the power for it. DEAD WRONG.

Also, when I had everything apart for the turbo install, I went ahead and did my 50 hr service. Machine currently has 45.5 hours on it so I figured it was close enough to 50 hrs.
 
Top