Leak in transmission housing - repair questions

quid_non

Member
Greetings All!
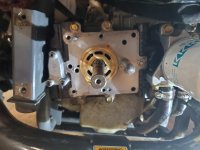
Got a 2007 RTV 900 with a small but bothersome leak in the transmission housing. I have narrowed it down to the piston housing at the rear right next to one of the transmission oil filters:
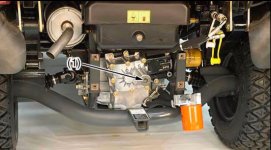
12-4-2020 5-14-54 PM.jpg12-4-2020 5-14-54 PM.jpg
The gasket around this housing is likely worn as it drips from the bottom of the housing.
The service manual says to remove the piston case round plug (#1 in the pic above) and then proceed removing the 6-7 long bolts to release the housing and refit w/ a new gasket.

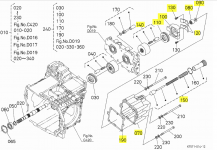
I just can't seem to get that plug loose - - it wont budge. Tried using a penetrating oil , impact driver, torch t heat, pound with hammer - - no luck. The assembly likely is under some type of pressure from the spring and piston assembly - part #150 in the IPL below. I need to replace gasket #190 in the IPL below.

Anyone replaced this gasket ? Any suggestions on how to move forward?
Appreciate all help and comments!!
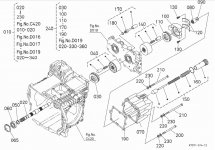
12-4-2020 5-25-46 PM.jpg12-4-2020 5-25-46 PM.jpg
 

aurthuritis

Well-known member
Site Supporter
you won't get that plug out. just go ahead and remove the bolts and pull the rear case off. check for cracks in the case. some have been found cracked and leaking just as yours
 
  • Like
Reactions: Doc

quid_non

Member
you won't get that plug out. just go ahead and remove the bolts and pull the rear case off. check for cracks in the case. some have been found cracked and leaking just as yours
OK - thanks!
Wondering if that spring has a lot of pressure on it both for ease of removal and re assembly.
Good point about the cracks - did not consider that.
Thanks
 

D&D Farm

Gold Site Supporter
Gold Site Supporter
For me, it was minute.......VERY SMALL CRACKS...in the housing. Part #70. Honestly I got it all apart just fine; but it was how to get the assembly all back together and hold it in place while getting the housing back together. It seemed to take 4 hands to do this with one of those hands holding the assembly while putting the housing back on the transmission.
I ended up loading it on the trailer and taking it to the great dealer in Chattanooga.....Was worth the price of the 2 hours of shop labor that it took to get the thing back with all in place.

The mechanic there advised that there must be a lot of pressure in there to cause all of the "stress" cracks. Rare but obviously it is happening and that leak on the floor is a pain in the tail for sure...........God bless....Dennis
 

aurthuritis

Well-known member
Site Supporter
For me, it was minute.......VERY SMALL CRACKS...in the housing. Part #70. Honestly I got it all apart just fine; but it was how to get the assembly all back together and hold it in place while getting the housing back together. It seemed to take 4 hands to do this with one of those hands holding the assembly while putting the housing back on the transmission.
I ended up loading it on the trailer and taking it to the great dealer in Chattanooga.....Was worth the price of the 2 hours of shop labor that it took to get the thing back with all in place.

The mechanic there advised that there must be a lot of pressure in there to cause all of the "stress" cracks. Rare but obviously it is happening and that leak on the floor is a pain in the tail for sure...........God bless....Dennis


did you remove the plug before taking off the rear cover???
 
  • Like
Reactions: Doc

D&D Farm

Gold Site Supporter
Gold Site Supporter
Gonna try to find the thread where I put it in here. Maybe the pictures can tell us cause honestly, I have slept a few times since last april or whenever. Common sense says that I just took off the housing bolts and went from there. When looking at the schematic, there is no reason to remove that plug in order to get the cover housing off............
 

quid_non

Member
In reading this:
(4) Cracked Casting/Cover | Page 2 | Net Tractor Talk
I had a heck of a time taking off that plug and then when I did there was nothing there......Just take the casting off and go from there......God bless.........Dennis
Just a quick update - I followed your and Aurthuritis advice and just removed the casing. A bit of pressure pushing out on the bolts form the piston but it went fine. I cleaned the case and the mating surface - that old gasket looks like metal and was a real bear to get scraped off! Smeared a tiny bit of grease on the new gasket and reinstalled. It was a bit tricky - -needed to really push the housing on the case. Tightened up bolts slowly in a diagonal fashion to get even torque. Used a torque wrench to tighen up to recommended specs. I also followed the note in the service manual to use Teflon sealing tape on the long bolts. After all was done - I inspected the housing for tiny stress crack and found lots of them - almost identical to these

Well we will see what happens - - cleaned the housing well with acetone and then applied JB Weld to see if that will last a bit. I believe that a new housing is in my future... Messicks has it at about $120. Will I need to order the internal bearing an sealing piston nut also? Cant seem to find a part number for those.

Letting the JB Weld set for a day to cure then will add new UDT oil to the case after changing both filters.

Thanks all for your help!!
 

quid_non

Member
Sad news - got all back together and added UDT fluid. Let run for a few minutes and no leaks. Checked fluid level and all was good. Took it out for a test drive and it was doing fine UNTIL it got to a slight incline then nothing but a stall - it wont move at all. Tried to shut off and let set for a bit but no difference - the transmission just wont engage in either F or R. Wondering if it has something to do with the big bearing in that housing not getting seated correctly. I followed the service manual on reinstall but still getting all back together with was difficult. Anything I should check before I take it to dealer?

Thanks
 
  • Like
Reactions: Doc

quid_non

Member
Great point - the rear facing filter closest to the housing I took off is the suction filter? If it appears to have lost prime (little or no fluid in it) just fill up with UDT and screw back on?

Thanks!!
 
  • Like
Reactions: Doc

quid_non

Member
Thanks - as soon as it gets above freezing here I will try that. I'm hoping that solves the problem!!
Thanks for the tips!!
 
  • Like
Reactions: Doc

quid_non

Member
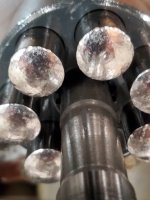
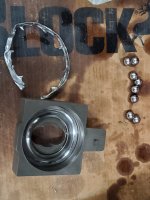
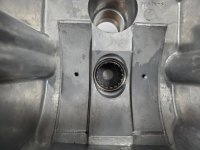
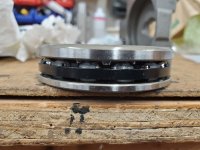
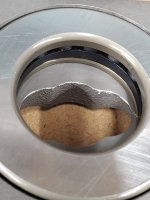
Well Bummer - not one of my finer moments. Found the problem. Evidently I did not reassemble the bearing/race assembly correctly - it self destructed in the housing - 20201208_171045_resized.jpgAlso - the mating rods look scored.
Soo... looks like I will need to order some parts to fix. For what is was worth - the JB weld did NOT seal the leaks in the housing hair line fracture.
Do you think I need to replace those mating 6-7 piston looking items. They are not terribly scored - perhaps a bit of polishing with emery paper will smooth them out. My learning lesson here - pay more attention the the IPL diagram AND how the disassembly went. The IPL was not terribly clear on the bearing races - but live, learn and spend more $$. Kubota dealer said they cant fit me in for at least 4 weeks.
20201208_171100_resized.jpgTop
 
  • Like
Reactions: Doc

aurthuritis

Well-known member
Site Supporter
no sir you will need to replace the complete valve block and plunger assy. i would look that swash plate over real good and consider replacing it as well. sorry
 
  • Like
Reactions: Doc

quid_non

Member
Yuk!!
Oh well - better safe than sorry. That valve block and plunger assy is ~$370 and the swash plate about $120. I'm thinking that I probably should also replace the two filters also? They were new but given the amount of metal introduced into the system from the destruction of that thrust bearing assy it can't hurt.
Expensive lesson learned for not paying close attention. My Christmas gift to me....

Thanks again for all the help - I'll update after I get the parts from Messicks and installed.
 
  • Like
Reactions: Doc

quid_non

Member
Got all of the parts from Messicks right before Christmas - most were in stock but a few needed to be ordered. Replace all parts highlighted in yellow below:
1609162001707.png

A few notes:
1. Unable to get part 150 (piston assay) removed - no matter how hard I tried - purchased a new one (expensive but what was my option)
2. Based on a previous post - I also was unable to bet bearing part 80 removed - - bought a new bearing (80) and collar (90). I can see why it was impossible to remove -it was equally difficult to put into the new motor case (part 70)!
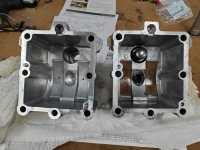
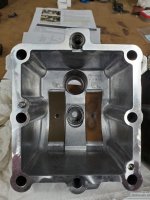
Comparison of old and new motor cases: (older on on right - had multiple hairline cracks on outer shell and leaked. JB weld did not solve the problem...
20201222_160102_resized.jpg


Required a steady hand and a socket (same OD as bearing) / dead blow hammer to get that bearing in the case and seated at the correct inset - - not easy!
20201222_162009_resized.jpg

3. I was unable to get the bearing race out of the swash plat (part 100) - so I needed to but a new swash plate.
4. Replaced the bearing cradle(s) (part #120) - hell I was in there already...
20201222_162434_resized.jpg


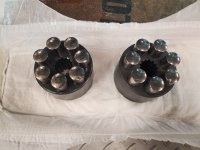
5. Soaked the piston assay block (part 140) and the Assy piston (part 150) well in UDT prior to replacing to make sure all was lubricated - the part on the left is the old assy piston part
20201222_155230_resized.jpg
This is where it mates:
20201222_155302_resized.jpg
6. Replaced the case gasket - - used a very small amount of light duty grease to keep it in place for reassembly
7. Paid very close attention to the thrust bearing races - they are different dimensions (inner and outer) and it makes a difference how they go back in - the service manual (p.181) states - thin race inside variable swash plate, ball bearing (open side down) - thick race out side
20201222_162731_resized.jpg

20201222_162802_resized.jpg

8. Be aware that the motor case (part 70) has two different length screws - -I numbered them prior to removal. Used teflon sealing tape on reinstall of the longer ones (as per manual)
9. Lightly Tightened the motor case screws in a cross patter to get even torque - when all were snug used a torque wrench to tighten to ~25 N.m
10. Installed piston (part 170) - torqued to ~75N.m!!
11. Despite the fact that the filters and UDT was brand new - due to t he self destruction of the race bearing and all of the metal fragment noted in motor case - Replaced both filters - suction and other filter. Filled each filter ~3/4 full with UDT2 prior to screwing on
12. Added ~2.5 gal UDT2, then let sit for ~30 min. Started engine and let idle in place for ~10min to circulate UDT. Rechecked fluid level and topped off with ~1 qt UDT2.

Took out for a test drive - - so far so good. I'm thinking it actually "shifts" easier now, but could be wishful thinking!!

Posted details here for anyone needing to address a small leak at this motor case - you may think it is a gasket but as pointed out to me earlier look VERY carefully for hairline cracks - I'll bet they are there. Also - don't repeat my expensive mistake - pay close attention to the reassembly sequence of the thrust bearing order.

Wishing all a great New Year - stay safe!!
 
Top