Reverse Lights for 2018 RTV X1100C

frodoz737

Member
Hi All,

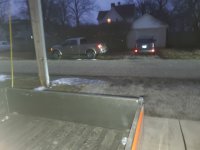
So...my new/used buggy is ready to go into service this Sunday at work. I'm an Airline Line RON Mechanic (overnight). Had full service performed, Hazard/turn signal lights, FT and RR work lights, reverse beeper, rear window grill and bed mat added at my local Dealership. Still a few things to do, but she's ready enough for now. Question/s specific to this thread are adding reverse light down low.

Found a time lapse video installing said lights, but no real info was given.

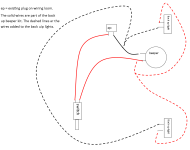
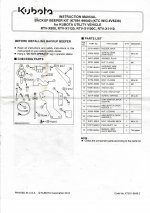
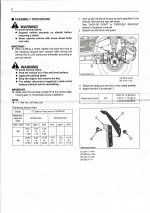
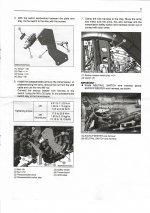
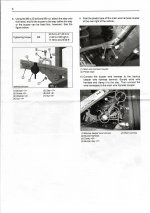
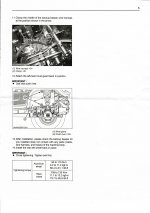
Does anyone know of a specific kit with detailed instructions and wiring diagrams for this install? I do have the Service Manual but this was no help as it applies.

Thanks.
 
Last edited:

Armyaviatr

Active member
SUPER Site Supporter
Does the back up beeper have a wiring diagram? Thinking you could some how tie into that circuit.
 

frodoz737

Member
Yesterday the local Kubota Dealership was kind enough to give me a printout of the Installation Manual for my Backup Beeper Kit (K7591-99640) (FTC W/G #V5236). No wiring diagrams were included. The kit's included harness plugs into a provisioned, but unused plug in the main harness back by the neutral switch harness right rear. Time to pull out the Fluke and start digging.
 

Armyaviatr

Active member
SUPER Site Supporter
So I finally installed back up lights for my x1100. I made an L bracket and they sit above my brake lights. I tied into the back up beeper instead of installing a relay and running extra wires. The lights draw 48 watts or 4 amps and the circuit seems to handle the load. here are some pictures, the first shows the lights mounted, the second shows behind the rtv with the lights off and the last with the lights on.
 

Attachments

  • 20220222_161511.jpg
    20220222_161511.jpg
    543.4 KB · Views: 52
  • 20220222_180121.jpg
    20220222_180121.jpg
    423.1 KB · Views: 50
  • 20220222_180232.jpg
    20220222_180232.jpg
    437.5 KB · Views: 50

frodoz737

Member
My guess is if you were inclined to post a detailed illustrated how-to there would be a lot of appreciative people out there...my self included.
 

Armyaviatr

Active member
SUPER Site Supporter
here is a very simplified wiring diagram of how I connected my back up lights. I added 3 water proof electrical connections and ran the drivers side wires in the machine's wiring loom and 2 water proof connectors at each light. I maintained the plugs that came with the back up beeper, and the one on the wiring loom where the back up beeper wiring loom plugs into the machine. This will not work unless you purchase the back up beeper assembly from kubota. If you didn't want the beeper and just the lights I believe the individual parts: the switch, brackets, nuts and bolts and wiring loom cost more that the complete kit.
 

Attachments

  • back up lights.png
    back up lights.png
    53.1 KB · Views: 39

HBTexas

Well-known member
Gold Site Supporter
So you had to have the backup beep kit to work this >?
And when you put the shifter in reverse the light come on ? NICE !
 

Armyaviatr

Active member
SUPER Site Supporter
the RTV doesn't come with the reverse switch, which is part of the beeper kit. So now I have reverse lights and beeper. I originally wasn't going to attach the beeper, but since I had it I thought I might as well.
 

Armyaviatr

Active member
SUPER Site Supporter
I miss spoke earlier, if a guy just wanted back up lights the parts are pretty reasonable. here are the parts needed and cost at messicks. If there is interest I will post the instructions from the kit.
ItemDescriptionquantityPrice
K7591-96410STAY,SWITCH BACK
1​
$7.20​
03714-50520SCREW, TAPPING
2​
$0.65 each
01754-50820BOLT
2​
$3.74 each
K2581-62260PLATE, SWITCH
1​
$2.01​
K7591-96440ARM,SWITCH BACK
1​
$16.25​
01611-50612BOLT, CUP-SQ-NK
1​
$2.34​
02556-50060NUT, LOCK
1​
$3.69​
K7591-96420WIRE HARNESS,BAC
1​
$14.91​
Total: $55.18
 

Doc

Admin
Staff member
Gold Site Supporter
Thanks. Since you went this far, instructions sure would be nice. Thank you sir!!!! :tiphat:
 

BiffNH

Well-known member
SUPER Site Supporter
I miss spoke earlier, if a guy just wanted back up lights the parts are pretty reasonable. here are the parts needed and cost at messicks. If there is interest I will post the instructions from the kit.
ItemDescriptionquantityPrice
K7591-96410STAY,SWITCH BACK
1​
$7.20​
03714-50520SCREW, TAPPING
2​
$0.65 each
01754-50820BOLT
2​
$3.74 each
K2581-62260PLATE, SWITCH
1​
$2.01​
K7591-96440ARM,SWITCH BACK
1​
$16.25​
01611-50612BOLT, CUP-SQ-NK
1​
$2.34​
02556-50060NUT, LOCK
1​
$3.69​
K7591-96420WIRE HARNESS,BAC
1​
$14.91​
Total: $55.18
Thanks for this list. I have been on the Messick's site and have downloaded the attached which really helps. I need to spend some time finding the reverse cable - looks like some skid plates, etc. must be removed to gain access. Having the directions for the reverse beeper will help if you can post them. The back-up lights that I am looking at draw only 4 amps so I, like you, will assume that connecting to the beeper wiring will be safe.
 

Attachments

  • ku-90479-377930-3745854.pdf
    316.7 KB · Views: 37

Armyaviatr

Active member
SUPER Site Supporter
It helps to remove the exhaust cover, inner mud flap and the wheel to access the reverse switch. If your back up beeper is already installed you can hook up the lights without removing anything. If you look from the back the backup beeper is at the intersection of upper crossmember and the passenger side rear frame. If you are running 2 back up lights you can run the drivers side light under the upper crossmember, and connect both lights at the beeper. Some times I am too anal for my own good. I didn't run the drivers side light under the cross member but ran a power and ground wire back to the switch and added a plug there. The other side of that plug I put in with the drivers side factory wiring harness. Neither the beeper wiring plastic sleeve nor the factory wiring sleeve were large enough to accommodate the extra wiring. I un taped each wiring harness and replaced the plastic sleeve and taped it all back together similar to how kubota does it at the factory. Keep in mind that my x1100 was a basket case. I brought the unit home as a pile of pieces with the transmission completely disassembled in a box in the bed and the HST and engine and all interior parts removed as well. So I had easy access to the wiring harness. In fact the plastic sleeve does not fair well in the sunlight. Any of the harness that was exposed to the sunlight crumbled and fell apart when touched, so it all needed replaced anyway.
 

BiffNH

Well-known member
SUPER Site Supporter
Thanks for the great suggestions. I don't have a beeper so I will be purchasing the switch and hardware to do the job.
 

Armyaviatr

Active member
SUPER Site Supporter
here are the instructions for the back up beeper kit as promised.
 

Attachments

  • Page 1.jpg
    Page 1.jpg
    771.9 KB · Views: 77
  • Page 2.jpg
    Page 2.jpg
    766.4 KB · Views: 61
  • Page 3.jpg
    Page 3.jpg
    973.4 KB · Views: 65
  • Page 4.jpg
    Page 4.jpg
    694.8 KB · Views: 57
  • Page 5.jpg
    Page 5.jpg
    656.6 KB · Views: 54

geohorn

Well-known member
SUPER Site Supporter
L.E.D. Worklights installed on back of cab with dedicated switch does the job for me. (and if I want to back up without showing bright lights to the rear is also possible.)
 

BiffNH

Well-known member
SUPER Site Supporter
Thanks to you for providing the great information I ordered the materials and have installed a backup lamp and it is wonderful! Installation was fairly easy - kind of tight on the hands, but it worked out well. The second picture is with all the lights out in my shop so the light is certainly effective. The third picture shows it tucked away and protected.
IMG_0759.JPGIMG_0758.JPGIMG_0757.JPG
 
Top