Thank you for letting us know FTG.. I'd rather also had the new one over used for not that much more myself. Messicks has real nice folks there... I ordered my ujoints and they knew all about me with just my serial # .  collie
collie collieThank you for letting us know FTG.. I'd rather also had the new one over used for not that much more myself. Messicks has real nice folks there... I ordered my ujoints and they knew all about me with just my serial # .
That's not a bad price since its a Kubota part...that's a big part
What you do about the axle housing......get a new one?
Or have I missed something here.......lol
I bought it from a tractor dealer about 40 miles north of me. He got it via an estate sale and didn't have much info to go with it. It's obvious whoever "fixed" it last didn't care if it lasted or not. It's a 2006, almost 10 years old, I bought it with my eyes open.
 bordercollie
I just replaced the u joints on my 2011 RTVxt. I have lots of pictures I will post when I have time either tonight or asap. I have gotten better at this since I first started this thread way back in 2011 though and have some extra information to share. It does though feel great to be in the old Bota again. I sure missed it - a bunch .
I just replaced the u joints on my 2011 RTVxt. I have lots of pictures I will post when I have time either tonight or asap. I have gotten better at this since I first started this thread way back in 2011 though and have some extra information to share. It does though feel great to be in the old Bota again. I sure missed it - a bunch .
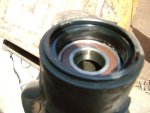
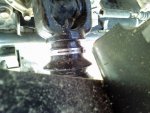
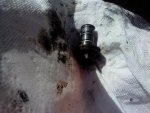
") The only thing I noticed was a little " gasket " that fit on the threaded axle behind the lock washer's flat washer. It resembled a water hose washer but larger. My old model didn't have this. collie
The only thing I noticed was a little " gasket " that fit on the threaded axle behind the lock washer's flat washer. It resembled a water hose washer but larger. My old model didn't have this. collieIt's hard to believe that it has been 4 years since I started this thread. [snip]
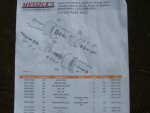
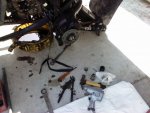
One thing that will help you if you are new to doing this job, is to take the parts and lay them out in the order of removal and take lots of pictures.
More tomorrow.
More importantly: cut the rear axle into at least two different parts, weld flanges to tie the two parts together. Never again.
I would not do that, nor would I recommend it.
Fitch
I realize a lot of folks already know how to do this job but am listing some small details for those doing this the first time. Some things I do may be wrong but this way has worked for me.
When I didn't have luck with doing a project doing it one way and was at my wit's end, I would think and pray about it overnight and then , the next day, I knew what to do or at least where to start.. The story of my life all summed up
First I get the RTV all nice and clean. wash wash wash . Make sure to clean around the transmission drain plug too....
If you have a heavy tool box like me, you will want to raise the cargo bed and put the choc on the cylinder to keep it from up and from leaking down. This is so the transmission can be refilled on completion of the job. It also gives some head room. Last time I took the bed off. Not this time though. Time to Drain the transmission. I cleaned the plug and see very little "stuff on the magnet plug after several hundred hours of sudt2.
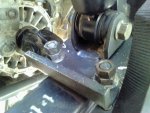
I position my rachet bands as a sling n each side to allow them to hold the "axle" when I remove the leaf spring bolts .
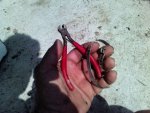
first though I sea saw the nub on the visible boot clamp just a few times with a pair of pliers (seen on the table in the first pictures) and it comes loose easily. I will use a similar but large pair of pliers to gently( because they are sharp)s put the new clamp on when the job is finished. I leave the other clamp on the end of the 2 boots on. (save that money- it all adds up)
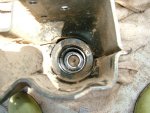
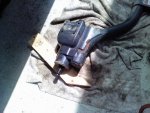
I went ahead and removed the castle nuts while I had the RTV 's axle still attached to the machine and while it was elevated with the safety jack stands and floor jack. .Then removed Everything "loose"including the hub . (as seen on the table in the previous picture.)
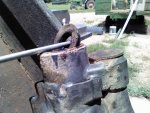
When the nuts are removed from the springs, the axle will free fall so be sure to first notice how the u joints are put together and make a mark before that happens, That way you will know how the "Phasing from the factory" is. I just felt up in the "hidden" part of the axle to confirm that part. more on that later.. When the axle comes down, the outers and inners ujoints will come apart. The rachet bands will help here though.
After it is down comes the fun part. I worked a 13 hour day today in the heat so will continue with my adventure tomorrow. bordercollie
Thanks . I had to re position my straps a couple of times because I first had them too tight. That is where the rachet feature is very, very handy. It's like having a hoist. I will try to look through my pictures and see if I have one of the best "fit" on the frame though. I did learn what that little hole is in the rachet lever for... a phillips screwdriver can be put in there as a pry lever when releasing a too tight rachet. Main thing is pull out all of the slack possible so that the band won't "overfill" before getting at the place you want. . I stood the axle on its end ,then let penetrating fluid sit around the edges of the shaft etc..the top of one and on the inside of the lower one- preferably over night and then flip and repeat. I was careful not to damage the axle threads as I did this flipping.Maybe put the castle nut back on to help protect them during this phase. You may also be able to see the little gasket there on the end of the threaded shaft . I didn't have this on my '05. After this soaking - which really really helped me_ I lay the axle down and get ready to find out what is ahead of me... collie