RTV 900 Head Gasket

wheezer

Goofy Member
Site Supporter
Thanks, muleman. I'll do that file thing on it.

I have been down that fan operation road already on this RTV. When I first bought it, I noticed that it had a curious manual toggle switch mounted under the seat. It would turn the fan on and off manually. I removed it because I thought that was unreliable and taking a chance for planning to reach down and flip a switch if you saw it running hot. After further investigation I found a control circuit fuse that was blown, preventing the automatic operation of the fan. So, apparently the previous owner put in the manual switch because he couldn't figure why the fan wasn't working automatically like it should. After replacing the fuse and running the engine until it got to just above halfway of the temperature gauge, the fan came on like it should. I guess at some time in the past that fuse blew and prevented the fan from coming on, therefore running the engine hot.

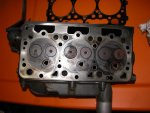
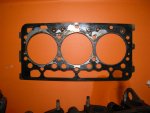
I kept hearing a tick, tick, tick that I thought was my valves needing adjustment but I also found that my compression was low and I couldn't pull a hill so decided it was the head gasket. I'm hoping for a lot more power when I get the head gasket replaced.

Muleman, you don't remember it but you have helped me a couple of times in the past. You and I emailed back and forth, I think it was about the coast valve issue and I know we discussed the issue I had with my axle hubs stripping out on the back of my other RTV a few months ago. I really have benefitted from your help in the past. I appreciate it!

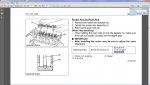
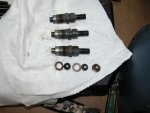
Also, Doc, on the pics, thanks. The one of the injector nozzles and glow plugs is fuzzy but I guess it shows them to some extent. I guess I had the camera too close on that one.
 

oldhat

Senior Member
Site Supporter
There is no such thing as to clean. Diesel motors like clean. It looks like there may have been head gasket leaking. Pay attention to the injectors and lines. Blow out the lines and be careful on cleaning the injectors. After cleaning I would put then in a zip lock bag so they stay clean. It looks like the head and the block surface could stand more cleaning. There was a problem with the center cylinder, it was not burning right. I would have that injector checked. It could also have been getting moisture in there from a blown gasket. Harder to tell after some cleaning on the head.
 

wheezer

Goofy Member
Site Supporter
Thanks, oldhat. How would you recommend I clean it from here -- scrape it with a putty knive approach or use some sort of solvent or something?

Also to further add to your diagnosis, the gasket was separating on one side into 3 layers. Does that mean it had excess heat on it or what?
 

wheezer

Goofy Member
Site Supporter
I did another hour of cleaning. Attached pictures show the mating surface of the head now. Also, I included a couple of pictures of the existing gasket and a side view of it to show the separation of the layers of the gasket. The gasket also had a little distortion in it that you might be able to tell in the side view -- like a bent place near the middle. I think I have the head about as clean as possible without taking a grinder or something to it which I know wouldn't be good because it would disturb the flatness of it. I did all this cleaning using a putty knife to scrape it. I'm ready for the gasket now. I ordered it Monday so it won't be here for a few more days. I'm anxious to get it all back together and see if that's going to improve the sound of the engine and the power.

One thing that sort of concerns me is an area in the picture of the head, at about the index mark on the injector hole for the middle cylinder. It's a flaw or crack. You can see it in the photo. I'm going to keep my positive attitude and consider this a flaw in the original casting and keep my fingers crossed.

I have included a photo of the injector nozzle holders too. Is there more disassembly that can be done to them or is this about it? I just blew them out with air to clean them is that all you can do? Also shown are the heat seal and the copper gaskets. I have ordered replacements for these as directed in the service manual.
 

Attachments

  • DSCN4546.jpg
    DSCN4546.jpg
    63.6 KB · Views: 143
  • DSCN4547.jpg
    DSCN4547.jpg
    54.8 KB · Views: 140
  • DSCN4548.jpg
    DSCN4548.jpg
    41.5 KB · Views: 133
  • DSCN4550.jpg
    DSCN4550.jpg
    57 KB · Views: 142

oldhat

Senior Member
Site Supporter
The head looks alot better. I have had good luck cleaning a head with a cone shaped wire brush that attaches to a drill. Not a course brush but a finer brush. If you use a die grinder with a wire brush be sure and get a brush that is rated for high speed or it will through the wire out and will be a danger. Put on your safty goggles!
I can not tell if that is a crack. you could take it to a machine shop and they could check it. It would be better to know than to put it back on and then find that it was a crack.
When you get it running I would put a 1/2 can of sea foam in the fule . If there is a cloged injector that should clean it out.
 

wheezer

Goofy Member
Site Supporter
Thanks, again, oldhat. I did take the head to a local guy who is experienced in such things. He said he doubts that it is a crack (music to my ears) but if I get it back on and the new gasket doesn't cure it, I should actually measure the compression in each cylinder. If only the middle one is low, then he would lean more toward thinking I should get the crack/flaw welded and re-milled. So, that's what I'll do.

Where do I get the "sea foam" stuff to spray in the fuel? Is that a brand name or what?
 

oldhat

Senior Member
Site Supporter
Local auto parts should have it , I have also seen it at Walmart. It is in a 16 oz can or bottle I think it is white and red. More white than red.
 

bordercollie

Gold Site Supporter
Gold Site Supporter
Old Hat is right. It is about $8-9 a can. You can see and read about it on amazon too. :) bordercollie
 

wheezer

Goofy Member
Site Supporter
Okay, yeah, I see it on amazon.com. There's a NAPA store about 2 miles from me. I'll run by there and snag a can. Thank y'all.
 

muleman RIP

Gone But Not Forgotten
Gold Site Supporter
A good shot of the old style carb cleaner in those injectors while they are setting up helps dissolve gunk inside them. You know to torque lightly then follow specs and order to finish torque. Run it till warm and check torque and valve lash again.
 

wheezer

Goofy Member
Site Supporter
I got the gasket in yesterday but they shipped it in soft padded envelope so it got bent a little on the way. I installed it anyhow but I don't have full confidence in it. I got the head bolts in and torqued in proper sequence without issue. But, when installing the rocker arm assembly I broke one of the dern bolts. I was using a torque wrench intending to put only eight foot-pounds on it but it broke before I got there. As you would expect, it's not a bolt that the dealers keep in stock. So, I'm down till next week waiting on that.

I'll clean those injectors while I wait. Thanks mule man.
 

SpudHauler

Active member
Site Supporter
Too late to the party, but just like to add that a BRASS wire wheel is great for cleanups and less harsh than the more common steel wire wheels.
 

wheezer

Goofy Member
Site Supporter
Thanks, Spudhauler, I'll have to get me a brass brush. I fear that I'm going to have an opportunity to clean this head again next week when I have to replace the gasket AGAIN. I'm just afraid that it getting bent in shipment is going to come back to haunt me.
 

SpudHauler

Active member
Site Supporter
I wouldn't think a slight bend in a new head gasket would cause another leaking head, but stranger things have happened.

You better have the head checked for warping and or have it planed flat again if warped.

Have the block checked as well.

Doesn't take much to affect the sealing power of the little thin head gasket.
 

wheezer

Goofy Member
Site Supporter
If the new gasket doesn't work, I will get the head repaired. I'm waiting on my order for the rocker arm bolt right now.
 

wheezer

Goofy Member
Site Supporter
I believe I determined why one of my rocker arm bolts broke: When replacing the rocker arm after torquing the head bolts, one of the valves will be in the open position, therefore requiring pressure on it to overcome the valve spring tension. You can't just slap the rocker arm back on and expect the bolts to push the valve down on its own. I believe it puts uneven pressure on the bolt, thereby breaking it sometimes. I think it is only safe to loosen the valve adjustment nuts and back out the screw to allow plenty of slop before bolting the rocker arm down and torquing the bolts. Then adjust the valves after getting the rocker arm bolts torqued to spec. Some of you smart guys can comment on this and tell me if that's something I was supposed to know or if I am wrong about it.
 

SpudHauler

Active member
Site Supporter
Wheezer,
I've replaced cams and rocker arms on lots of engines, none in a Kubota RTV, and they are all the same.

There will always be some valves that will be pushed open in the process of replacing the rocker arm.

Yes, loosening the adjusters will help, but I've rarely if ever done that.

When mounting, slowly lower the unit evenly. Tightening all three stud nuts at the same time. By that I mean, push the rocker arm on the studs as far as possible by hand, start each of the nuts and slowly turn each down the same amount in progression until the rocker is down in place. Then get out the torque wrench and tighten to specs 16-19 ft lbs.

Rotate the engine a few turns then adjust valves 0.005 - 0.007 th clearance (cold).
 

wheezer

Goofy Member
Site Supporter
I'm with you spud. Only thing, spec on these rocker arm bolts is only 7.2 - 8.3 ft-lbs.
 

SpudHauler

Active member
Site Supporter
Sorry but you are wrong. Here is the workshop manual specs for a 1100 but this would be the same for the 900 as well.

And just to be clear, the valve adjustment is very close to .006 th and .007 th, I set mine to .006 th the last time I did them on both my 900 and 1100.

And the head bolts are;

Enjoy!


.
 

Attachments

  • RTV1100 Rocker Arm Nut.jpg
    RTV1100 Rocker Arm Nut.jpg
    48.5 KB · Views: 69
  • RTV1100 Valve Clearance.jpg
    RTV1100 Valve Clearance.jpg
    49.3 KB · Views: 73
  • RTV1100 Head Bolts.jpg
    RTV1100 Head Bolts.jpg
    54.8 KB · Views: 72

TWO GUNS

Senior Member
Site Supporter
This is what my WSM shows on RTV 900
Is this what you are looking at ?

.......... two guns
 

Attachments

  • RTV Rocker Arm Spec.jpg
    RTV Rocker Arm Spec.jpg
    102.3 KB · Views: 77
Top