2011 Kubota RTV 900 R transmission stuck in reverse FIX

Ky2T

New member
Well, the title says it all really. I do not own the machine, but it belongs to the farm I run. Today while backing out of the garage I shifted from reverse and the fork jumped out of it's cups. So, the Boss pondered sending to the shop @ $165.00 an hour, versus my wage to repair the machine. As of this evening I have been tasked with the repair.

Thanks to user doggman, I was led to a short video, but it was as vague as the old description. Between the two of those posts I feel pretty sure I can do it. I will take pictures of each major step, and post here if there is any interest. I realize I am new here but I hope this is not only allowed but welcomed. This place is an amazing source of information. I have lurked to get posted opinions with the common issues on that beast, and now I will be able to actually contribute.

Since this has been posted before I hope I can just simply add to what is already here.
 
Welcome Ky2T . Glad to have you on this RTV forum !! Somewhere here, I posted a video off of "youtube" that demonstrated the owner popping his RTV's fork back in place. I'll try to find it.
edit :
Thanks. Yeah I watched that one, it was actually the one that I was talking about. Thank you.

I did the job, took the step by step pics and have not managed to sit down in one place long enough to post the step by step....ugh.
 
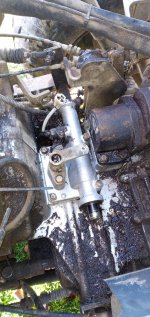
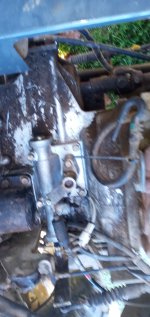
So....be clean with this job. You really do not want any dirt or grass or, well, anything to fall in to the transmission. Can of brake kleen and a wire brush is perfect for this.20211208_110109.jpg

Now to make the removal easier remove the shift cables from the linkage arms. You will be reconnecting them BEFORE you reassemble. Don't forget to unplug the safety switch.

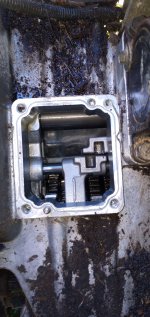
Once you remove the four bolts (2 short go up front the longer 2 go toward the rear) you might have to pry (GENTLY) to release the cover from the two dowel pins. 20211208_113856.jpg

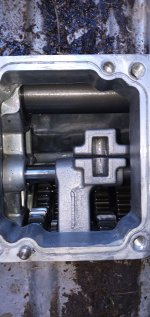
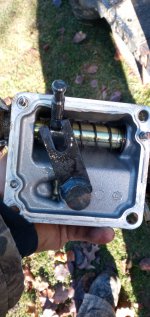
Here you can see the two shift cups that need to be lined up so the cups are even. Use a long screwdriver or small crow bar. Expect a small amount of resistance20211208_114240.jpg This is the neutral position of the shift cups.

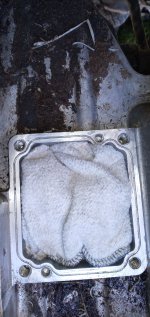
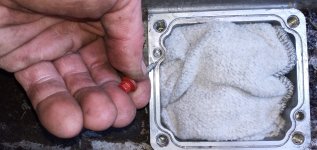
You will need to clean the sealant from the mating surfaces, but again you want to keep craps from falling into the transmission. Using a clean shop rag just cover the hole and make sure debris cannot fall into case. Like this:20211208_115402.jpg

Make sure to clean the groove really well. I am used to using my surroundings to my advantage, so I used a roofing screw I had in the bed of the machine...lol. 20211208_115413.jpg

Be sure to clean the mating surface of the cover as well, when doing so be certain to position the shift ball into the forks.
20211208_113906.jpg

I used a high temp Grey silicone sealer but I assume any that are oil resistant and high temp will work fine.

Make sure to move the shift lever to neutral and reattach the cables to the arms on the cover. Just hold the lever in the forks while lowering the cover down. I seated the cover onto the dowels and made sure I could shift into all the ranges before installing the bolts, but you might be able to skip that step.

That is really all there is to it. Super simple, if not a bit intimidating for first timers. Be clean, be careful and soon you will be done.20211208_121300.jpg
 
So....be clean with this job. You really do not want any dirt or grass or, well, anything to fall in to the transmission. Can of brake kleen and a wire brush is perfect for this.View attachment 13524

Now to make the removal easier remove the shift cables from the linkage arms. You will be reconnecting them BEFORE you reassemble. Don't forget to unplug the safety switch.

Once you remove the four bolts (2 short go up front the longer 2 go toward the rear) you might have to pry (GENTLY) to release the cover from the two dowel pins. View attachment 13525

Here you can see the two shift cups that need to be lined up so the cups are even. Use a long screwdriver or small crow bar. Expect a small amount of resistanceView attachment 13526 This is the neutral position of the shift cups.

You will need to clean the sealant from the mating surfaces, but again you want to keep craps from falling into the transmission. Using a clean shop rag just cover the hole and make sure debris cannot fall into case. Like this:View attachment 13527

Make sure to clean the groove really well. I am used to using my surroundings to my advantage, so I used a roofing screw I had in the bed of the machine...lol. View attachment 13528

Be sure to clean the mating surface of the cover as well, when doing so be certain to position the shift ball into the forks.
View attachment 13529

I used a high temp Grey silicone sealer but I assume any that are oil resistant and high temp will work fine.

Make sure to move the shift lever to neutral and reattach the cables to the arms on the cover. Just hold the lever in the forks while lowering the cover down. I seated the cover onto the dowels and made sure I could shift into all the ranges before installing the bolts, but you might be able to skip that step.

That is really all there is to it. Super simple, if not a bit intimidating for first timers. Be clean, be careful and soon you will be done.View attachment 13530
Great job!
 
Top