RTV idle adjustment

FTG-05

Active member
While doing some maintenance on my RTV900G6 Worksite, including fuel filter replacement, I found the idle adjustment bolt on the front of the engine.

It's detailed in this video here:

What I discovered is that on my RTV, not only is the anti-tamper piece missing, but also the cap nut. Furthermore, the adjusting bolt was slightly loose. Hence, I have no idea where the bolt is supposed to be adjusted to. And this probably accounts for the inability of my RTV to idle correctly.

The Idle Apparatus (as Kubota calls it) is shown on Messicks drawing 020000. However, when I go look in the WSM manual, the idle apparatus is never mentioned nor is there any procedure, that I could find, on how to set up the original idle for the engine using the Idle Apparatus.

Anyone know how to set the idle adjustment to factory settings?

Right now, my RTV will start but not stay running.

Thanks,
 

geohorn

Well-known member
SUPER Site Supporter
That video does not address “idle” adjustments. It tells how to enrichen the fuel (add more fuel-to-ai-ration) to the running mixture.

The idle adjustment is a safety-wired screw which sits on the throttle-plate (fuel-pump-bellcrank) and if you have someone press on the “accelerator” pedal you will see the bell-crank I’m addressing.... and you can adjust idle speed with that.

Beware: These little 3-cyl diesels do NOT idle smoothly at low RPM and should not be adjusted to a slow idle or vibration will damage exhaust manifolds and various brackets on the vehicle. The idle should be at a level which allows smooth running at minimum speed... and it will be MUCH higher than you might expect. The WorkShop Manual specifies 1300-1400 RPM which is almost TWICE as fast as most other internal engines. Listen to the engine and when you think it sounds like it’s running at what would produce a fast-walk... you are are at the LOW end of idle.
 
  • Like
Reactions: Doc

FTG-05

Active member
It's almost like you didn't read a word I said. :(

Allow me to try again:

Kubota - you know the people who design and manufacture RTV900s - call that specific bolt mechanism, the "Idle Apparatus". See part diagram 020000 on the Messicks site for RTV900R6 2006-2009 models.

That specific bolt mechanism on my RTV is loose. I'm asking what is the factory setting for that specific bolt mechanism.

The purpose of referencing that video is to show which specific bolt mechanism I was asking about. You know, for people who may not want to open and read part diagram #020000.
 

shinnery

Active member
That screw or bolt is commonly known around diesel circles as the "SMOKE Screw" adjust it out until you get the amount of smoke you want when driving the RTV. Adjusting it OUT increases the amount of fuel available to the engine. (weither it can use it or exhaust it as black smoke) After adjusting it reread geohorn's advice on setting your idle. The title of this post is about IDLE. and he answered that. Just my thoughts.
Bryce
 
Last edited:
  • Like
Reactions: Doc

aurthuritis

Well-known member
Site Supporter
I need to set it to the factory setting first. What is the factory setting?
the specs on factory adjustment isn't available. this screw is the fuel rack limiting screw."my terms". like said before but since it has been loose for a time i would set the throttle at full with the engine OFF. THEN CAREFULLY turn the screw in until you can just feel the screw touch the rack. probably a very slight resistance. then i would proceed in for about two turns and lock. then i would start the engine and warm up the engine and transmission. then i would test drive and examine the exhaust at full throttle under a modest load. if the engine and performance is ok and the smoke in the exhaust is minimal or not existent then leave it alone. if there is no smoke under load and you need more power,then i would back out the screw by 1/2 turn and lock the nut. repeat the process until you just barely see a little smoke and go no farther out.
 

aurthuritis

Well-known member
Site Supporter
In my factory wsm x1100c. The screw is called the fuel limitation screw. And also referred to in the manual as the max torque limiter. Can be found on pages 1-M2 and 1-M3 rtvx1100c wsm.
 

geohorn

Well-known member
SUPER Site Supporter
It might be best, in your case, to simply take it to a Kubota dealer and pay them to set it for you... while YOU enroll in an anger-management session.
 

FTG-05

Active member
Found the procedure on another site. I set it and after several minutes of cranking, starting then running only for a couple seconds, the engine finally started and stayed running. Lots of blue smoke. Have no idea if that was due to the idle apparatus adjustment bolt being slightly off or the bio-slime problem in the fuel making it's way through the fuel system or the injector cleaner doing it's job. All the other idle adjustment bolts on the Speed Control Plate are all tight and I saw no reason to change them.

I ran it for about 30 minutes or so. I still have the same "no power going up hill problem" as I did before I started all this, so that's not attributable to: the ball of bio-slime I found in the fuel tank, the almost fully gunked up fuel filter or the almost fully gunked up spark arrestor (that the previous owner said he had removed - Liar!). All of these have been fixed, so that leaves replacing the mechanical OEM fuel pump with a Yanmar electric pump (arrived yesterday) and/or replacing the two HST inlet hoses (supposed to arrive today).

After about 30 minutes +/- of running, the exhaust cleared up with very little visible blue or black smoke. It's clear that the idle apparatus bolt adjustment that I set to near factory settings is not too open, so the factory setting advice I got looks to be pretty close.

I'll bypass the OEM fuel pump this afternoon, then see if it runs any better. Can't drive it right now due to replacing the rear spring mounts and the bolts haven't come in yet (McMaster = tomorrow or maybe even today).
 

bordercollie

Gold Site Supporter
Gold Site Supporter
My neighbor runs big JD tractors , combines and a huge cotton picker on around 3000 plus acres. He was all into bio diesel and even had a big set up in his barn where he produced it for his own use. He dropped it like a hot potato even after being on tv abut how great it was. I guess I know why now after reading your posts. Hopefully, after you get this bio stuff all out of your fuel system, things will improve. I sure hope so. I never had that problem with bought diesel thankfully ,so am at a loss for other suggestions . We do put a conditioner in our farm tank when it comes and use Donaldson filters on it.
 

geohorn

Well-known member
SUPER Site Supporter
I don’t use as much diesel as real farmers do but I decided to abandon 5-gallon jugs and built my own \.
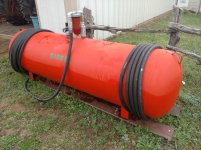
Here's the solution I've made: I had two friends who gave me some equip't they had no use for... an old 160 gal propane tank, and a 30' delivery-hose/nozzle which was a new replacement intended for a marina system (his BIL sold the marina and had no further use for the new hose/nozzle.) The 30' hose is much longer than needed but has proven useful after-all because I don't have to maneuver/bring the equipment up close to refuel them.

Propane is a "sweet" fuel so I wasn't too worried about the inside of the empty tank but after removing the valves I did look inside with a bright light and found it relatively clean. I figured with a good filter and if I pick the fuel up from a few inches off the bottom there'd be no issue...and so far, that has proven to be true. Absolutely no water or debris has been found in the water/particulate filter so far.
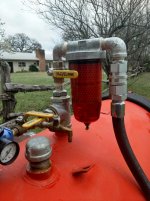
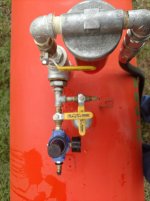
The system is powered by shop-air delivered from my hangar (which you can see in the background) via a regulator set at 10 psi. (Any more would cause the nozzle to "jump" in the hands similar to an unconstrained fire-hose.) Shop air is dry because the shop compressor has a water-separator on it. The air enters the tank thru an air quick-connector, thru the regulator w/gauge, then thru a ball-valve to the tank...pressurizing the tank/fuel.... which is pushed up a dip-tube which has it's bottom end 2" above the tank bottom. The fuel passes up the dip tube, thru another ball-valve, then thru the water/particulate filter, then thru a set of hydraulic quick-disconnects into the hose to the nozzle.
The reason for the quick disconnects on the hose is for when I use the FEL to place the tank on my stock-trailer to haul the tank to the fuel distributor (saving another ten-cents/gal) and the reason for the three ball-valves is 1) to close the tank air inlet, 2) close the tank fuel outlet, and 3) vent tank pressure to atmosphere if necessary (for example, before opening the cap to re-fill the tank.) The ball-valves also are arranged so that in order to remove the tank cap, the valves MUST be placed in a position which vents/removes all pressure from the tank beforehand.
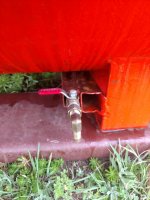
Another ball-valve is fitted to the lowest point of the tank to test/drain for any water. (And a clear tube can be connected between the open drain and the vent valves to allow fuel to enter that tube so tank quantity/contents can be seen, if necessary.) I have no meter on it because I don't feel it necessary for my operation...I keep a log on my fuel delivery into the equipment related to the hour-meters on that equip't. I have the diesel for my Kubota M4700DT and a Ferguson 5-8B Compactor/Roller (has a John Deere 4329 engine) for maintaining my turf airplane runways among other things. (Hogs sometimes dig up the runways and the roller mashes it back smooth very easily, and compacts the ground which has caused the hogs to lose interest in that area.)
The state laws allow a farmer/rancher to transport fuel in tanks that are not permanently attached to a trailer, so I have farm tags on my trailer which also exempts from Federal HazMat laws in my state, and I only have 7 miles via back-roads to my distributor. I've spent about $125 on building this system and the 140 gals of fuel purchased was at a price that more than made up that amount. The only concern is whether or not I'll use that much fuel in a year, so I've treated the fuel with Diesel-Sta-Bil and Biobor JF biocide (which is what we used in the jets I flew corporately) to prevent issues with cetane or biologicals.
The only issue I've had was a need to re-construct the dip-tube after I discovered pressurized air foaming the fuel delivery. The first dip-tube was threaded in to a reducer screwed into the underside/top of that "T" which also brings pressurized-air into the tank. That NPT style of thread prevented a perfect seal on the underneath side of the reducer, so my second dip-tube was threaded, welded, and then sealed with JB-Weld before installation into the "T", and that has solved the foaming problem.
I plan next to fabricate a 10-ga. metal cover which will hinge/flip-over to replace the correct-color upside-down Home Depot bucket that presently protects the filter/valve system from the elements. I don't have a theft problem where I'm located (in the middle of 1500 acres and 2 miles from the nearest county road...anyone who gets to my place either belongs here or is lost and had to get thru a security gate a half-mile away also)...but a lock could easily be placed on the cover (in case the potential thief happened to bring his air compressor to drive the system.)
Hope this is useful for others.
Notice the Water/Debris Filter installed on the exit, purchased this filter from Tractor Supply.
(Ignore the “wet look” in the photos... it had just rained.)
 

Attachments

  • 6643F9E6-074B-4F16-BBDA-AE85588C81C6.jpeg
    6643F9E6-074B-4F16-BBDA-AE85588C81C6.jpeg
    108.7 KB · Views: 4
  • E16447D3-730B-4278-AC77-B21EB70B1AC5.jpeg
    E16447D3-730B-4278-AC77-B21EB70B1AC5.jpeg
    107.8 KB · Views: 4
  • AF9EEDE1-148E-4598-A135-4C55C601FC40.jpeg
    AF9EEDE1-148E-4598-A135-4C55C601FC40.jpeg
    100.8 KB · Views: 5
  • 0CE5886B-A2F2-4F43-9269-001F414DACCB.jpeg
    0CE5886B-A2F2-4F43-9269-001F414DACCB.jpeg
    90.1 KB · Views: 5
Last edited:

FTG-05

Active member
My neighbor runs big JD tractors , combines and a huge cotton picker on around 3000 plus acres. He was all into bio diesel and even had a big set up in his barn where he produced it for his own use. He dropped it like a hot potato even after being on tv abut how great it was. I guess I know why now after reading your posts. Hopefully, after you get this bio stuff all out of your fuel system, things will improve. I sure hope so. I never had that problem with bought diesel thankfully ,so am at a loss for other suggestions . We do put a conditioner in our farm tank when it comes and use Donaldson filters on it.
Please do not interpret my term "bio-slime" as coming from bio-diesel. AFAIK it's not sold around here. I bought my RTV used, so it may have had it in the past, but not since I've bought it.

Here's a pic of the "bio-slime" I'm talking about:

IMG_0909 (Large).jpeg


IMG_0911 (Large).jpeg

I thoroughly cleaned out the tank using gravel, chlorox, dawn dish washing liquid and more chlorox.

I've replaced the fuel filter and all the fuel lines with SAE J30R9 Fuel Injection Hose. I've also got a quart of Biobor JF biocide to treat my farm fuel tank, Kubota L4330 tractor and Kubota ZD326 ZTR.

Hopefully, between all this and replacing the mechanical fuel pump with an electrical pump, I can get the power back so I can down and back up my hills.

Thanks,
 

bordercollie

Gold Site Supporter
Gold Site Supporter
Oh good !!! I 'm relieved about that. Yea, I've seen the real slime like you're talking about in an old diesel tank that we moved- probably years worth . It was as goopy as old paint and nasty .
 

geohorn

Well-known member
SUPER Site Supporter
BIO-diesel is simply diesel sourced from other products than an oil well. It is NOT what caused the slime.

ALL diesel fuel (as well as kerosene and other light oils) can support “YEAST” growths which cause this problem. It occurs when ordinary condensation allows droplets of water to settle in the tank. When the fuel is consumed...atmosphere enters the tank thru the vent system (otherwise there’d be a vacuum form and the engine would die because it could no longer pull fuel from the tank). That atmosphere has “biologicals” (Yeast, etc.) in it. (This is how sour-dough bread and beer and wine was discovered.)
The “biologicals” live in the water/condensation which formed from the humid atmosphere... and eat the fuel for food. They POOP waste etc. and that forms the “slime”.
The FIX is to use a Biocide to clear-out existing growths and prevent future contamination. A “shock” treatment is first applied to any stored fuel and the waste-products are caught by the fuel filter. When the tanks are clean, a new filter installed and a “therapeutic” level of treatment is used onwards.
My personal favorite is “Biobor JF” because that is what I’m familiar with (from my days managing fuel systems in corporate jets.). But there are other products on the market as well. Choose one, clean out your tanks, apply a shock treatment and let it sit overnight then add additional fuel to bring the mix to a “therapeutic” level your engine can consume safely and use therapeutic treatment in your fuel thereafter.
Hope this helps.
 

FTG-05

Active member
would please share the method of adjustment for the loose screw???
OK, good question. The procedure I read on-line was to loosen the lock nut and screw the adjustment bolt all the way in - carefully, don't rank on it! Then back it off 1 1/2 turns, then lock it.

What I did is screw it all the way in, then used a tri-cornered file to cut a small slot on the end of the bolt. That way I had a clear shiny marker to count turns. I turned mine out 2 turns, then locked it down with the OEM locking nut, then locked that down with another nut. Note that my cap nut was missing.

But now I have another problem: I replaced and bypassed the mechanical fuel pump with a Yanmar 12 vdc diesel electric fuel pump. Here's the model I bought as recommended in the fuel pump thread: https://www.amazon.com/gp/product/B011X767F0/ref=ppx_yo_dt_b_asin_title_o04_s00?ie=UTF8&psc=1

After trying to start for several minutes, it finally caught and stayed running; however I had to hold the throttle down to keep it running. When I let off the throttle, it slows down, down, down then dies. Recall that I went through this after adjusting the idle mechanism, it finally caught and then stayed running - long enough for me to determine that I still had the "no power up hill" problem. So the "it won't idle" problem appears to be new. The only other thing I did was make a bracket to attach the Return Spring to the Speed Control Lever (part of the Speed Control Plate). See drawing 000300 Cylinder Head, item 130 and drawing 020500 Speed Control Plate, item 060.

I open to suggestions here. Other than adjusting the Idle Apparatus adjusting bolt, I've not touched any of the other idle screw or bolts and they are all solid and tight.

I've also noticed that the Stop Solenoid is no longer releasing and appears stuck; don't know if that affects idle or not. I have another on order from Messicks as we speak. (The Amazon version had two many negative reviews).
 

bordercollie

Gold Site Supporter
Gold Site Supporter
When my stop solenoid went bad, I had to crawl under and manually release it until my new one came in.
 

bordercollie

Gold Site Supporter
Gold Site Supporter
Mine was on the upper passenger side and came off the side of the engine sorta. The only thing mine did was just try to start. It was turn over but until I released the lever. it was just go uuuuuuh uhhhh when I turned the key. There is a picture on this thread . I moved the lever with the red screw . It's close to the fan blade, so if you are having to kill the engine manually, then be careful. https://www.nettractortalk.com/forums/threads/stop-solenoid-replacement.14088/
 

FTG-05

Active member
Yea, yours is in the same position mine is. The "climbing underneath to close it" comment through me. I read that thread earlier: It's one of the reasons I bought Kubota, along with the negative reviews vs. the chinese Amazon version.
 
Top