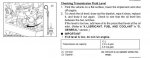
Treehouse, I just change the tranny fluid and filter last weekend on my 2011 RTV 900 so it's fresh on my mind. The first recommendation is to raise the RTV off the floor to assist with the service. I've just been using two set of car ramps that raises the RTV close to one foot. The tranny holds 2.6 gallons, so ensure that your catch basin have the necessary capacity. Remove the drain plug, then remove the plastic oil fill cap to provide a good vent path. Clean the drain plug of any filing caught by the magnets. Next remove the tranny filter guard. This guard can be removed as two pieces or one. I've removed it as one piece without much effort. Six cap screws hold the guard in place.
By now the fluid should be drained to a drip. You'll need to move the catch basin beneath the two tranny filters. Remove the filters, then clean the sealing surfaces on the tranny.
Install filters, after applying clean oil on the filter's O-rings. Reinstall the filter guard and drain plug. Remove the mesh strainer located in the oil fill hole. Add new oil, install mesh strainer, and plastic cover. The clean your mess up!
I've used this time to remove skid pans to remove mud and seeds buildup and also perform other lubrications.
God Bless, Philip
") bordercollie
bordercollie