Lift Kit Homemade RTV900 1"

ovrszd

Well-known member
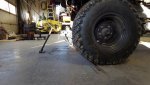
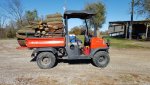
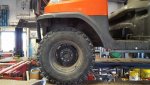
Decided I'd build a lift kit. I'm always dragging my butt thru the timber. Thought maybe a 1" kit and then 27" tires might help that problem.

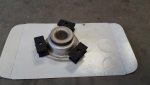
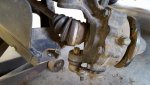
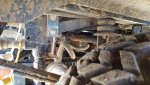
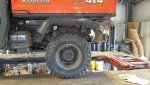
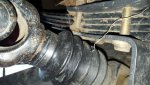
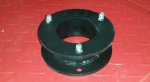
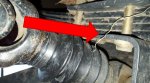
Started with the front. Built six 1" spacers, three for each side. Had to take the strut nut off so I could get the top bracket off and drive out the knurled bolts so I could replace them with longer bolts.

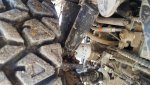
Putting that back together was a bit of a challenge. I didn't have a spring compressor so removed the springs, clamped them in a vice, wired them together, then installed and cut the wire after the top bracket was refastened to the strut stem. Sorry I didn't get pics of that process.
 

Attachments

  • 20151031_103459 (1280x720).jpg
    20151031_103459 (1280x720).jpg
    28.6 KB · Views: 200
  • 20151031_103440 (1280x720).jpg
    20151031_103440 (1280x720).jpg
    32 KB · Views: 197
This was a steep learning curve for me. All I could find online was 2" kits. I don't see how they work at all. I've got a considerable amount of positive camber now. Which means the top of the front tire is outside the bottom, or the tire is leaning outward at the top. A 2" kit would be dramatically worse. This is caused by the short length of the lower A arm. It's already running at a downward angle in stock configuration. Add lift and it gets worse. This pulls the bottom of the front tire inward. The positive camber that I have is tolerable. Wouldn't want any more.

Next problem is clearance between the lower ball joint and the lower A arm brace. On the passenger side it was tolerable. On the drivers side modifications had to be made. When assembled the lower ball joint was in contact with the lower A arm brace sitting at ride height. If any droop was encountered the A arm would be pushing against the lower ball joint and prevent downward droop of the wheel assembly. NOT GOOD.

So I took an angle grinder to the brace and made room for the ball joint. Again, with a 2" kit this would have been dramatically worse. And in the case of my RTV, both sides would have had to be ground out......

In the first pic you can see how my lower ball joint was already hitting the A arm brace at full droop. The second pic shows my grinding job. Third pic shows everything assembled after grinding to allow space for the ball joint assembly.

As I said earlier, I didn't have to do anything to the passenger side. Tells me the assembly of the lower A arms is not accurate. The brace on the driver's side was welded in place closer to the ball joint assembly than the passenger side......
 

Attachments

  • 20151031_114933 (1280x720).jpg
    20151031_114933 (1280x720).jpg
    57.1 KB · Views: 194
  • 20151031_115157 (1280x720).jpg
    20151031_115157 (1280x720).jpg
    55.7 KB · Views: 194
  • 20151031_115443 (1280x720).jpg
    20151031_115443 (1280x720).jpg
    42.2 KB · Views: 193
Next came the rear. I added an 1 3/4" to the rear leaf spring shackles. This gets tricky. I wanted an inch of lift. If the axle were centered on the leaf spring that would mean a 2" addition to the rear shackle. But it is not. It's a 36" leaf spring, measured from the front bolt to the rear shackle bolt. The axle is sitting at slightly over 20" from the front bolt. So after doing a bit of "shadetree mechanic" calculation, I added 1 3/4". Came out perfect.

Next problem. Extended the shackles. To do so you have to remove the top rear shock bolt to let the axle drop enough to put in the longer shackle. No problem.

Now I'm bolting everything back together. With just an inch of lift the rear shock is extended all the way at ride height to replace the top bolt..... What?? If I had built a 2" kit and left the shock mounts at stock location I would have had to load the rear of the RTV to bring the body down to the point I could have replaced the top shock bolt....... So in stock shock absorber configuration a 2" kit would only raise the rear a little over an inch because I would have to collapse the suspension an inch to reinstall the top shock bolt...... What the???? So you have absolutely no droop. I can't live like that.

So I cut the top shock mounts off the frame and built new mounts that lowered the top shock bolt an inch. Gotta be careful when doing this because you also have to consider compression. You don't want the shock being the only thing stopping the RTV from compressing with a heavy load.

With a full load of heavy wood my bump stops over the axle are contacting the frame as they should. My rear shocks have an inch of collapse left, as they should.

Now Geometry being what it is, the rear bump stops that hit the rear axle brace/hitch bracket aren't touching. Not even close. This is because I have changed the caster of the rear axle by adding length to the rear shackles and not lowering the front spring mount. No worries. Just need to keep that in mind for the time being.

So I loaded the RTV and took some pics.
 

Attachments

  • 20151101_122959 (1280x720).jpg
    20151101_122959 (1280x720).jpg
    87.4 KB · Views: 193
  • 20151101_123034 (1280x720).jpg
    20151101_123034 (1280x720).jpg
    66.1 KB · Views: 192
  • 20151101_123100 (1280x720).jpg
    20151101_123100 (1280x720).jpg
    67.9 KB · Views: 193
  • 20151101_123238 (1280x720).jpg
    20151101_123238 (1280x720).jpg
    70.3 KB · Views: 193
Now I've got my transaxle assembly above my rear axle bracket. Only thing that will raise the height of that bracket is taller tires. It's a lot of work to give these vehicles clearance....

So, the only thing left that I can do to increase clearance is to do something about that boat anchor hitch receiver on the rear. Using my beer can measurement from earlier I decided I could raise it an inch as well. I also shortened it about 1/2" in the process.

This gives the vehicle a better departure angle. Still not good in the sense of off road vehicles but better than it was. Not much can be done about the configuration of the older leaf spring models to improve this situation.
 

Attachments

  • 20151104_162127 (1280x720).jpg
    20151104_162127 (1280x720).jpg
    46 KB · Views: 192
Here's a glance at what I've gained. Sorry I didn't think to take before/after pics as I was doing this.

First pic is before lift with a load of dirt.

Second pic is after lift with the wood load.

Third and fourth are static pics on the hoist with no load.
 

Attachments

  • 20151011_111310 (1280x720).jpg
    20151011_111310 (1280x720).jpg
    76.2 KB · Views: 193
  • 20151101_122959 (1280x720).jpg
    20151101_122959 (1280x720).jpg
    87.4 KB · Views: 192
  • 20151101_102202 (1280x720).jpg
    20151101_102202 (1280x720).jpg
    67.5 KB · Views: 193
  • 20151101_102143 (1280x720).jpg
    20151101_102143 (1280x720).jpg
    72.5 KB · Views: 192
Oh, one last issue I want to address. Again, I can't see how a 2" lift would work without issues, but what do I know.....

I went with an 1" lift to not add stress to the axle joint assemblies. They already run at a steep angle in my opinion. So I tried to not reach the failure limit.

But, after I installed the kit I looked at everything at static ride height with no load. I took a couple pics of the rear axle assemblies. I was shocked at how close the rubber boots are to the axle bracket assembly. During droop they rub on the axle bracket. Not good.....

I'll run it this way for a few months and report any adverse affects I see.
 

Attachments

  • 20151101_101055 (1280x720).jpg
    20151101_101055 (1280x720).jpg
    69.8 KB · Views: 192
Thanks for showing this to us. I really enjoy this type of thread. There's always something to learn from. Good job!
 
Ken,

There's another member on here that built some kickbutt front spacers. Hope he'll jump in here and post pics of them.
 
Wow Richard,
Nice write up. been reading it over and over. So i finished my install last night actually of my 2" front lift. I was trying to just level the Plowing-Pumkin.
My problem is now i realize that i took all my measurements and tested sag with the plow frame on. Ooops. Now my front end is slightly high.

I built mine that way for both strength and the fact that plowing snow will show you EVERYWHERE that air/snow comes in to your nice warm cab. I also am blessed with access to a waterjet so that didn't hurt either. I welded button head machine screws in for the top because in my testing i found the strut was really hard to align by myself. I did have to countersink the bottom so it fit correctly over the cone on the top strut plate.

Richard, I do want to ask you this because of your time exploring the issue. What about a block lift between the spring and lower spring mount, like a body lift? after reading yours i think that it might keep all the suspension stock, but give me the approximately 1" lift that I would like to end up with. I would love to hear your thoughts. I think she will stay as is for the winter, she should sit perfect with the plow on, now i am thinking about the rear for next spring. Possible something i can change out for seasons.

Curt
 

Attachments

  • 20150221_lift.jpg
    20150221_lift.jpg
    34.8 KB · Views: 166
  • ScreenHunter_229.jpg
    ScreenHunter_229.jpg
    68.5 KB · Views: 167
Curt,

I really like your front spacers
Professionally constructed. And can be installed withou disassembling the strut spring. Very nice.

Did you inspect your lower ball joint clearance against the A-arm brace? Also, do you now have a lot of positive camber?

As for the rear. Yes, spring blocks would be better than shackle extension. Resolves the caster issue. Leaves the main bump stops in the same position in regards to the frame.

I didn't move the bump stops. So far I like it that way. Actually gain an inch of flex when loaded. Before I was sitting solid on the bumpers with no rear suspension flex at all. Now when loaded on uneven terrain I feel the rear suspension working a little better. Tends to keep all 4 wheels on the ground better.

Thanks for adding to this thread. Maybe future readers can learn from our errors and build a better product. :)
 
Yea my camber is more positive. I didn't see any interference at the ball joint but I am going to double check that after reading your write-up. To measure and test originally I unbolted the top of the strut and using different thicknesses of steel block inserted i dropped it back down, then lowered the plow to the floor. The camber looked good.
In saying that i think i will be ok with the plow on this winter. I think i will run this way and then decide if i need to rethink this.
I have always been a do it yourself guy, I like machining parts, and half the fun is the learning curve that comes with it.

Curt

“I have not failed. I've just found 10,000 ways that won't work.”
― Thomas A. Edison


I'm the same way. Get much more satisfaction out of building rather than buying.

And like Mr Edison, I have an iron pile full of things that won't work.

You and I are gonna get along great!!! :)
 
Hey Curt,

Been thinking about the spring block thing. How bout a degreed wedge spacer that would give an inch of lift plus rotate the axle assembly forward, raising the dreaded rear axle brace/hitch???

With shackle extensions or spring blocks the "boat anchor" which is the brace/hitch is still at the original height.
 
Wanted to talk a bit about moving the hitch. This is only an issue if your purpose of lifting the RTV is for ground clearance. I think most times, the decision is based on leveling as Curt is doing or to add larger tires. For me, the primary reason was ground clearance. So it is critical to address the hitch.

The problem with the hitch is that it restricts "departure angle". By raising it this situation is improved. In this pic you can see that my hitch is still restricting me. It will normally drag on the ground before the rear axle brace. I couldn't raise it any higher or it would hit the hydraulic pump assembly when the suspension is fully compressed with a load. So it's about as good as it's going to get.
 

Attachments

  • 20151107_082257 (1280x720).jpg
    20151107_082257 (1280x720).jpg
    55.5 KB · Views: 138
Well I went home and checked her out (the front lift) and my ball joints have clearance. It looks like it was run with bad ball joints by the previous owner and where you ground was already rounded out for me.
The last pieces I had left to fix were my front fenders, but they were all cracked and broken. I was searching the interweb Thursday by part number to try and find some used ones and had a hit on Coleman Equipment. they had a right and left listed at $20 each. they replied to me that they were new OEM and 5 minutes later i had them ordered. They showed up 10am Saturday and i had the time. they are all installed, my brush guard and grill are all sprayed, and everything is back together.
Ran her around all weekend and she rides and handles better than ever (if you remember along with the lift i put new hubs in the front).

As far as the rear hitch goes Richard I have not had a problem. my hitch has a 3" upward curve so it drags but hasn't caught on anything (yet). I keep my hitch in all the time because i use it soooo frequently. I am just looking to get her sitting right, my OCD was killing me :wink:
 
when lifting you need to watch your axles.the stock axles are made to be put on a stock machine.if you raise it then the axles need to be longer.i had a gator hpx and I raised it just under 2" I started having problems with my front axles popping out when riding.i eventually took out the lift kit and made a smaller one just enough for the tires to clear If I remember I still had a problem with the axles being pulled out when riding so I done away with the lift altogether. another problem people have and you might not have this problem with just a 1" liftis the cv boots when you lift the machine the boots ripple will rub together and create heat and will burn a boot up really fast. this is not really a problem if all you do is wet muddy riding but if you run them on dry surfaces they will heat up .so keep an eye on the boots and the axles.oh one other thing if you ever think your cv joint is going bad because it's making a clicking sound don't waist money buying a new one just take the old one out disassembl it clean it really good and repack it with grease. I had my rear cv joint on my rhino that was clicking and popping real bad so I figured what the hell why not see how it's made so I took it apart then I figured why not just clean it repack it and give it a try and yup it works great glad I didn't spend the money on a new one.
 
Well I went home and checked her out (the front lift) and my ball joints have clearance. It looks like it was run with bad ball joints by the previous owner and where you ground was already rounded out for me.
The last pieces I had left to fix were my front fenders, but they were all cracked and broken. I was searching the interweb Thursday by part number to try and find some used ones and had a hit on Coleman Equipment. they had a right and left listed at $20 each. they replied to me that they were new OEM and 5 minutes later i had them ordered. They showed up 10am Saturday and i had the time. they are all installed, my brush guard and grill are all sprayed, and everything is back together.
Ran her around all weekend and she rides and handles better than ever (if you remember along with the lift i put new hubs in the front).

As far as the rear hitch goes Richard I have not had a problem. my hitch has a 3" upward curve so it drags but hasn't caught on anything (yet). I keep my hitch in all the time because i use it soooo frequently. I am just looking to get her sitting right, my OCD was killing me :wink:

Glad Coleman fixed you up. They are 100 miles from me. Sortta newly into the online parts market but seem to be very reliable.
 
when lifting you need to watch your axles.the stock axles are made to be put on a stock machine.if you raise it then the axles need to be longer.i had a gator hpx and I raised it just under 2" I started having problems with my front axles popping out when riding.i eventually took out the lift kit and made a smaller one just enough for the tires to clear If I remember I still had a problem with the axles being pulled out when riding so I done away with the lift altogether. another problem people have and you might not have this problem with just a 1" liftis the cv boots when you lift the machine the boots ripple will rub together and create heat and will burn a boot up really fast. this is not really a problem if all you do is wet muddy riding but if you run them on dry surfaces they will heat up .so keep an eye on the boots and the axles.oh one other thing if you ever think your cv joint is going bad because it's making a clicking sound don't waist money buying a new one just take the old one out disassembl it clean it really good and repack it with grease. I had my rear cv joint on my rhino that was clicking and popping real bad so I figured what the hell why not see how it's made so I took it apart then I figured why not just clean it repack it and give it a try and yup it works great glad I didn't spend the money on a new one.

These axles have more than enough slip for a 2" lift.

At 25mph and less it would be near impossible to create enough rubbing friction heat to melt a rubber boot. At stock height tbey have rub marks on them.

CV joint clicking is generally caused by a metal deformity of some kind. Cracked ball. Cracked socket. Dry condition that has caused chafing. If it's a minor condition some time can be bought by repacking. Or if the boot has failed and let in water/debris and limited lubrication. Not sure in your instance what the cause was
But sounds like you caught it in time. That's rare.
 
Top