Changing the Front Boots on RTV900

bordercollie

Gold Site Supporter
Gold Site Supporter
This is an easy job. I will post these pictures a little at a time -I need to sort the pictures but the shaft is all put back together- I just waiting on the oil seal to come in before I'm completely through with it.
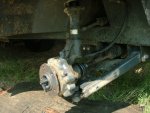
In the first picture you can just see the crack in the vein of the boot.
In the net picture, I've removed the tire ,removed the pin and am removing the axle nut.
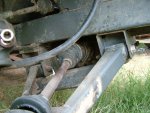
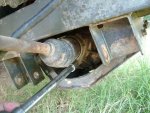
In the third picture, I will proceed to remove the ball joint nut and tie rod nut and knock them out. I will also loosen the nut holding the strut on the knuckle case-but not remove it.I marked it's resting place on the knuckle case so if it moved, I could put it back exactly. Now I have a piece of wire ready to hold up the knuckle case and strut when I swing it out of the way. The wire is secured to the assembly and I swing it out of the way-while holding the axle with my hand. The axle comes out of the knuckle case easily and the assembly is tied out of the way. bordercollie
 

Attachments

  • DSCF3627.JPG
    DSCF3627.JPG
    58.6 KB · Views: 1,261
  • DSCF3629.JPG
    DSCF3629.JPG
    52.3 KB · Views: 1,217
  • DSCF3631.JPG
    DSCF3631.JPG
    48.9 KB · Views: 1,213

bordercollie

Gold Site Supporter
Gold Site Supporter
Next Step

Next I need to remove the A arm in order to get to the 3 bolts holding the other end of the shaft. After you remove the A arm, you can get to the 3 nuts easily.
Make sure that the O ring in the picture is not dropped out or damaged. Remove the shaft by just a tug.
More info tonight. bordercollie
 

Attachments

  • DSCF3634.JPG
    DSCF3634.JPG
    54.6 KB · Views: 1,214
  • DSCF3635.JPG
    DSCF3635.JPG
    59.3 KB · Views: 1,211
  • DSCF3636.JPG
    DSCF3636.JPG
    59.1 KB · Views: 1,215

pepr

Senior Member
SUPER Site Supporter
Bordercollie, thanks immensely for the great pictures and narrative. It's this type of information being shared that makes this forum tremendous. I look forward to additional info.
 

Heatwave

Active member
Thank you for this most informative post. I greatly appreciate your taking the time and making the effort to give all this info to us. God bless.
 

bordercollie

Gold Site Supporter
Gold Site Supporter
Thank you Pepr and Heatwave. This is the first time that I've done this boot thing too. I thought it might help to others to document it -seeing how boots can get torn or cracked from age. I was lucky that my moving parts under the boots were still in good shape so I just replaced the special cv grease I lost when cleaning the innards of the cv . I did that so I would know the condition- but most folks just leave it unless it is clicking and just go on with the boot . (I bought the outer boots off of ebay by the way). The way I do some of the things may not be the usual so if something doesn't look right then double check.Thanks again for the encouragement. Bordercollie
 

bordercollie

Gold Site Supporter
Gold Site Supporter
Front Boot Replacement

The first picture here shows the O ring that you need to be careful of. It could also be stuck in the groove on the aluminum case cover that was held on with the three bolts.
This is the picture of the whole "half shaft" on the table- a new complete like this is $500 per side! The end next to my cutters is the wheel end-called the outer. The inner end looks like a big socket.
This picture shows me opening the ears on the boot clamps so I can remove the clamps easily.This is the outer end.
I have flipped over the axle- now working on the inner side. Even though this boot is aged, it's not cracked but it is the only end that can be taken apart. So to replace the boot(s) apart it comes. (The manual says not to disassemble the wheel side(outer) joint.)
The end closest to my hammer (that looks like the big socket), when you remove it from the RTV will have a snap ring., a bearing, and then the triangular aluminum case cover attached to it.I don't guess you have to remove the snap ring and bearing in front of the cover but I did so I could check out the bearing.I have already remoed them in the hammer picture. To remove the "big socket" inner end , just stick your fingernail just in the edge of the cup and you will feel the circlip in the picture. just grab it with the fingernail at one of the indentions in the socket cup and pull it out. It isn't hard or springy so careful not to bend it. Also when you get through and are putting this circlip back make sure that the gap between the ends of it does not line up in one of the grooves or valleys. it needs to meet in one of the raised areas. Otherwise the little balls you'll be removing soon won't have anything to stop them from coming out. More to follow. bordercollie
 

Attachments

  • DSCF3637.JPG
    DSCF3637.JPG
    58.2 KB · Views: 1,176
  • DSCF3639.JPG
    DSCF3639.JPG
    42.3 KB · Views: 1,167
  • DSCF3641.JPG
    DSCF3641.JPG
    42.3 KB · Views: 1,154
  • DSCF3642.JPG
    DSCF3642.JPG
    46.4 KB · Views: 1,160

bordercollie

Gold Site Supporter
Gold Site Supporter
A few more steps

After you remove the circlip, you can slide out the steel balls and their holder/retainer on the shaft. After it slides out on the end of the shaft , the socket cup will be empty except for grease. Now when you look at the end of the shaft with the ball/ retainer you will see a snap ring . In order to get the boot(s) on ,you will need to remove this snap ring and then carefully remove the balls and retainer as one group.. It should just slide off as one piece ,but just in case be careful. Important:*** remember how the ball/retainer came out because it should only go back facing the same way.One side is sort of beveled and the other side isn't.***
. It will be covered with the special cv grease. Now is the moment of truth. If this is in sad shape with a lot of rough movement or looseness while it was still in the "socket cup" you may need to rebuild or buy a new assembly. It probably should be ok though unless you let the torn boot go and got dirt and stuff in there. Check both ends by wiggling them.
This picture shows the axle on the worktable after the socket cup and ball/retainer has been removed. Waiting for the boot(s) to be replaced.
Any way, now after inspecting everything, put both boots on the shaft and make sure they are going the right way along with the boot clamps for them. Make sure you have plenty of the special cv grease. You have to have the high temp, high pressure type cv grease- . normal grease won't do.More later. :) bordercollie
 

Attachments

  • DSCF3645.JPG
    DSCF3645.JPG
    40.9 KB · Views: 1,134
  • DSCF3647.JPG
    DSCF3647.JPG
    49.4 KB · Views: 1,133
Last edited:

bordercollie

Gold Site Supporter
Gold Site Supporter
Thank you Spudhauler. "She" always uses safety stands- I rather have them on concrete but the ground is so dry it is like concrete here.
If anyone decides to thoroughly clean out the bearings/ joint assembly(s) then you will need to pack back in the cv grease. I used the heel of my hand and mashed it in repeatedly.It took several minutes doing it. They hold a lot of grease- I was surprised. You will need plenty for the boots too. I read that you can't have too much or at least it would be hard to. bordercollie
 

TWO GUNS

Senior Member
Site Supporter
Thank you Spudhauler. "She" always uses safety stands-

" SHE " is very smart to use them safety stands. Don't want anything to happen to
bordercollie.

Let me say this, I want to thank you bordercollie for showing all of us the process. My hat goes off to you on this. Many of us will learn.

...... jamie
 

Attachments

  • Mercat.jpg
    Mercat.jpg
    192.7 KB · Views: 1,061
I offer a tip that I use on front wheel drive vehicles to prolong the life of the CV Joint - when replacing the boots on both sides (if one is dry rotten the other will follow) switch CV Joints side to side. This reduces the wear as the driving surface as it is now 180 degrees from it's original position. I've have CVJ's last 200k plus miles using this method. Boots are cheap compared to the CVJ. The labor is the same. And BTW, you can overfill w/grease. The joint must be allowed to move/flex in multiple directions. The boot changes 'size' (expands/contracts) during these flex events. CV Grease (Moly) is not easily compressable. Weakest point is that new boot & clamps you just installed. I was taught to fill the joint and add a 'smear' into the boot. The air space is actually helpful in keeping the CVJ lubricated.

That's my 2 cents and 30+ years of being a professional techician.
 

TWO GUNS

Senior Member
Site Supporter
I offer a tip that I use on front wheel drive vehicles to prolong the life of the CV Joint - when replacing the boots on both sides (if one is dry rotten the other will follow) switch CV Joints side to side. This reduces the wear as the driving surface as it is now 180 degrees from it's original position. I've have CVJ's last 200k plus miles using this method. Boots are cheap compared to the CVJ. The labor is the same. And BTW, you can overfill w/grease. The joint must be allowed to move/flex in multiple directions. The boot changes 'size' (expands/contracts) during these flex events. CV Grease (Moly) is not easily compressable. Weakest point is that new boot & clamps you just installed. I was taught to fill the joint and add a 'smear' into the boot. The air space is actually helpful in keeping the CVJ lubricated.

That's my 2 cents and 30+ years of being a professional techician.

HEY FOLKS >>>>> LISTEN
>>>>>>>>>>>>>>>>>>> WORDS OF WISDOM .....

PRICELESS !!!!!

..... Thank You So Much For The Tip !!!!!
.
......... jamie
 

Attachments

  • popcorncat.gif
    popcorncat.gif
    16.8 KB · Views: 1,010

bordercollie

Gold Site Supporter
Gold Site Supporter
One Last Thing

Thanks . I almost got smushed once by a wood planer and I try to be more careful now. I thought Rebok would be the last thing I saw then.My head was pushed down to my shoe that's why I saw the name Rebok. But God helped me on that one.
The oil seals aren't here yet but hopefully will be by this weekend -before the desperately needed rain may arrive. I would like to change sides when I do the other boot as suggested too. I won't clean up the innards of the other shaft components but will just replace the boot and give it a smearing of the cv grease.That is unless it deems inspecting. I will mention that I crimped the boot on the large end first and flexed the joint to make sure the boot wasn't too tight then I crimped it on the shaft last. It worked out to be in the exact place that the oem had been. Good Luck to all those who have to do the boot replacement. The thing I was most concerned about was the removing of the axles- and it was not a problem at all. Nothing was stuck like the problem I had with the rear u joint post. -No brake calipers etc to worry about. Just a brake line and I left it alone when I carefully swung the case out of the way. This can be a fun job and save you a lot of money too. The dealer here wanted $300 to $400 labor for both sides and I imagine he would have tried to sell me the bill of goods like was tried before. Cost of project about $45 total for both sides- That included an extra tube of the cv grease to repack the bearings I cleaned completely. Good Luck! bordercollie
 

Peanut

Well-known member
SUPER Site Supporter
you post are better than having a manual sitting in front of you.although i don't own an rtv if i did i would be looking up all your post for repair work how too's.great thread bordercollie keep them comin.
 

bordercollie

Gold Site Supporter
Gold Site Supporter
Thanks for the kind words Peanut. I can't pay for the high cost of repair unless I do it myself.If its complicated then I won't have a choice but for the basic stuff, I do and I'll try my best. :)bordercollie
 

Peanut

Well-known member
SUPER Site Supporter
from the looks of it you seem to tackle everything that comes your way .when you take on doing things like this you get to know the inner workings of your utv .the more you do the more you see how this thing makes this other thing work. kinda reminds me of a guy i heard of .his daughter bought a car and she had a problem with it so her dad being a engine savy person told her to bring it buy his house .well the old man was used to the old cars that just needed a carberator and sparkplugs to run .he started yankin out wires and stuff telling the daughter that this stuff is really not needed.to make a long story short the dad wasn't aware of the new cars being all efi and controled by computer chips and such .the daughters car was reduced to scrap and he had to buy her a new one.he never worked on her cars again.lol you jump into this mechanic work like a pilot on a mission. we gonna have to change your screen name from bordercollie to"GET-R-DONE".
 

bordercollie

Gold Site Supporter
Gold Site Supporter
Peanut , I would be in the same shape if I had to do engine work. :) Let me know about your stick stoppers whenever my pair come up and I'll square up with ya. bordercollie
 

Peanut

Well-known member
SUPER Site Supporter
i sure will i'm kinda shut down right now because of all the rain they say the t.d should be inland and gone by tuesday. i should be able to get back on them as soon as it passes.we should be ok on the water because it's been pretty dry around here they say we could see 15" of rain .gonna go top off my truck and welding machine and my other smaller generator and one can of gas just incase one of the substations flood and the power goes out.probably not gonna see winds higher than 50mph.the power poles should withstand that but you know them tree limbs if they snap they take out the power lines with them. back in the late 90's we had a small tropical storm that came through very slowly it just lingered off the coast and dumped about 20" of rain all the power poles stayed up but the power sub stations thet distribute the power flooded and shorted out. we was without power for about a week they had to let the water go down before they could safely get to the stations to replace the tranformers or whatever blew. one good thing about this storm is it put out that marsh fire in new orleans .i wish it would have hit closer to texas maybe it could have helped them out with their fires too.
 

sjstub

New member
Bordercollie, Thanks very much for the posting on replacing the grease cups on my RTV. It was the deciding factor in whether or not I tackled this job or not. Everything went smooth except I'm having problems getting the A-arm lined up and bolted back into place. Any suggestions?
Sjstub
 

bordercollie

Gold Site Supporter
Gold Site Supporter
Bordercollie, Thanks very much for the posting on replacing the grease cups on my RTV. It was the deciding factor in whether or not I tackled this job or not. Everything went smooth except I'm having problems getting the A-arm lined up and bolted back into place. Any suggestions?
Sjstub

Hi Sistub and welcome to the forum. Thank you- we are all in the same boat when it comes to trying to save $ and help each other too. Are you having trouble getting the rubber bushing part of the A arm up in there on each side? My bushings were snug but not tight , I tapped that area of the A arm with a rubber mallet and held it in place while I wiggled one of the bolts just in on each side- a bit at a time, until I got them started. I think if you could get it in position approximately you might carefully use a small crank jack to lift in in position being careful not to bend anything. I remember reading in the manual not to put oil etc on the bushings because it would cause deterioration later. You might also use a piece of rod or punch smaller than the bolt to line it up by wiggling it up and down or else drive the smaller rod partially out while moving it to help line up the pieces and start your oem bolt right behind it and carefully push the rod thru and out with it as your oem bolt drives home. Careful with the threads though. Let me know exactly what is going on and I will try something else. bordercollie
 
Top